How to Generate SSH Key in Windows 10?

Introduction
Generating SSH keys is an essential skill for protected communication among computer systems over a network. While Windows 10 is known for its user-friendly interface, generating SSH keygen might seem daunting for some users. However, with the help of OpenSSH Client and PuTTY, the process becomes much simpler and more accessible. In this blog post, we will guide you through the most easy ways to generate SSH keys in Windows 10, using both OpenSSH Client and PuTTY. By the termination of this guide, you will have a concise apprehension of how to generate SSH keys and utilize them for secure remote connections.
Generate SSH key in Windows 10 with OpenSSH Client

Following are the comprehensive steps to generate an SSH key in Windows 10 with OpenSSH Client –
Step 1: Launch Windows PowerShell
- On your keyword, press the key of “Windows”.
- In the search bar, you are needed to enter “PowerShell”.
- Select “Windows PowerShell” under the search results.
- This will open the PowerShell terminal.

Step 2: Generate the SSH Key Pair
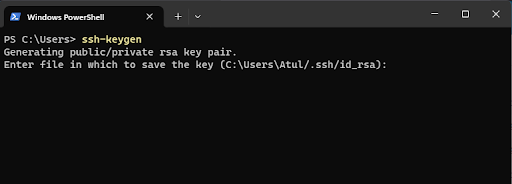
- In the PowerShell terminal, type the command: ssh-keygen.
- Press Enter to implement the command.
- This command will construct a new SSH key pair that incorporates a public & a private key.
Step 3: Choose a Secure Passphrase (Optional)
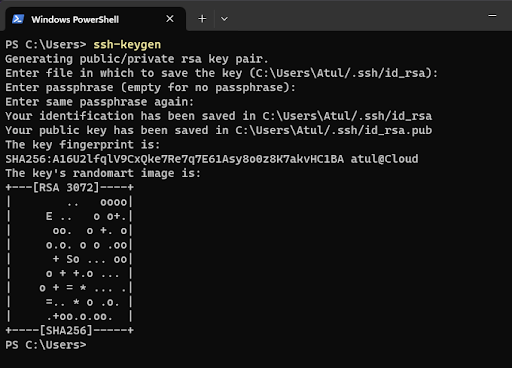
- While generating the SSH keygen pair, you have the option to set a passphrase.
- A passphrase appends an additional level of protection to your private key.
- To set a passphrase, you can follow the prompts in the PowerShell terminal.
- It is recommended to employ a powerful and distinct passphrase.
Step 4: Save the Keys to a Desired Location
- By default, the SSH key pair is saved and stored in the .ssh directory of the user.
- If you wish to save the keys to a different location, provide a file path during the key generation process.
- You can specify the file path using the -f or –filename flag followed by the desired location.
Step 5: Confirm Successful Key Generation
- After the key generation process is complete, you will see the output.
- This output confirms that the SSH keygen pair has been successfully generated.
Congratulations! By this end, you have successfully generated an SSH key in Windows 10 using OpenSSH Client. The generated key pair consists of a private key (id_rsa) and a public key (id_rsa.pub). Do not forget to keep your private key protected and never convey it to anybody. The public key can be shared with the remote servers or systems you wish to connect to securely using SSH.
Generate SSH Keys Using PuTTY

Step 1: Download and Install PuTTY
- Visit the official PuTTY website at https://www.putty.org.
- Download the PuTTY installer package suitable for your Windows 10 version.
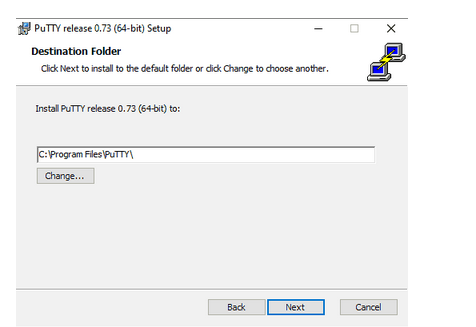
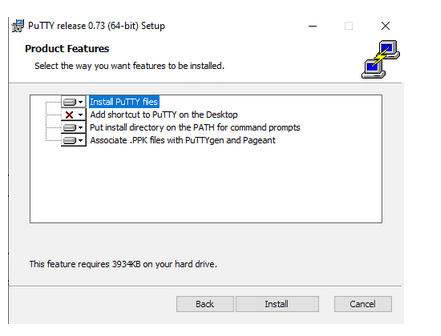
- Run the installer and follow the instructions that come up on the screen for completing the installation.
- Once installed, you will have access to various PuTTY tools, including PuTTYgen.
Step 2: Launch PuTTYgen
- Click on the Windows Start button.
- Search for “PuTTYgen” in the search bar.
- Click on the “PuTTYgen” application to launch it.
- This will open the PuTTYgen key generation tool.
Step 3: Select the Desired Key Type
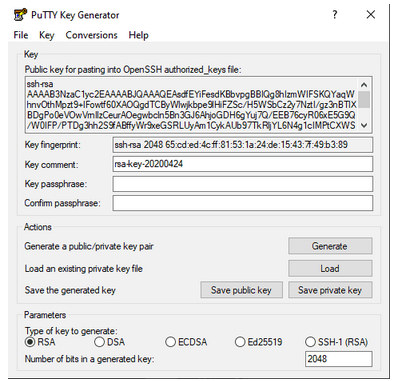
- In the PuTTYgen window, you can choose the kind of key you desire to generate.
- The default key type is RSA, which is widely supported.
- If you need a different key type, such as DSA or ECDSA, you can select it from the “Parameters” section.
Step 4: Set the Key Size
- The key size determines the strength of the encryption used in the SSH keygen.
- In the “Number of bits in a generated key” field, enter the desired key size.
- For enhanced security, it is recommended to use a key size of 2048 bits or higher.
Step 5: Generate the Key Pair
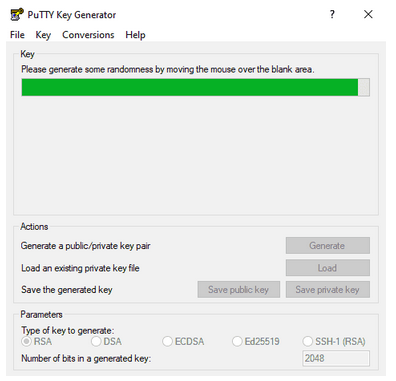
- Click on the “Generate” button in the PuTTYgen window.
- Move your mouse randomly within the PuTTYgen window to generate the random data necessary for key generation.
- As you move the mouse, the progress bar will fill up until the key generation process is complete.
Step 6: Provide a Passphrase (Optional)
- To add an extra level of data protection, you can set a passphrase for your private key.
- In the “Key passphrase” and “Confirm passphrase” fields, enter your desired passphrase.
- Make sure to choose a strong passphrase that is simple for you to remember but complicated for others to discover.
Step 7: Save the Keys
- Once the key pair generation is complete, you will see the public key displayed in the PuTTYgen window.
- Click on the “Save public key” button to save the public key to a desired location on your computer.
- Click on the “Save private key” button to save the private key to a safe location on your computer.
- It is significant to keep the private key protected and never share it with unauthorized individuals.
That’s all! You have successfully generated SSH keys using PuTTY. You now have a public key and a private key. The public key can be shared with the remote servers or systems you want to connect to securely using SSH. Remember to securely store and backup your private key and never disclose it to anyone.
Using Your SSH Keys

Now that you know how to generate SSH keys in Windows 10, you must be aware of how to put them to use. Here are the steps to use your SSH keys for secure remote connections:
Step 1: Copy the Public Key
- Open the public key file generated either by OpenSSH Client or PuTTY.
- You can usually find the public key in a file named id_rsa.pub or authorized_keys.
- Open the file utilizing a text editor and copy the whole content of the public key.
- Make sure to include the “ssh-rsa” or a similar prefix at the beginning of the key.
Step 2: Configure the Remote Server
- Access the remote server or system where you want to use your SSH key.
- Log in to the remote server utilizing your desired way (e.g., username and password).
- Navigate to the user’s home directory on the remote server.
- Look for a directory named .ssh. If it does not exist, you can construct one using the command mkdir ~/.ssh.
- Change the permissions of the .ssh directory by employing the command chmod 700 ~/.ssh.
Also Read: How can I Fix SSH Permission Denied?(publickey,gssapi-keyex,gssapi-with-mic)
Step 3: Append the Public Key to the Remote Server
- Inside the .ssh directory on the remote server, create a new file called authorized_keys.
- If the authorized_keys file already exists, you can skip this step.
- Open the authorized_keys file using a text editor.
- Paste the copied public key into the authorized_keys file.
- Now, you must save the file before exiting the text editor.
Step 4: Set Appropriate Permissions
- To ensure the security of your SSH key, it is essential to set appropriate permissions for the authorized_keys file.
- In the terminal, navigate to the .ssh directory on the remote server.
- Run the command chmod 600 authorized_keys to set the permissions of the authorized_keys file.
- This command restricts read and write permissions to the owner of the file.
Step 5: Connect Using SSH
- With your SSH keys in place, you can now establish a secure connection to the remote server.
- Open your preferred SSH client (e.g., PuTTY, OpenSSH) on your Windows 10 system.
- In the SSH client, enter the IP address or domain name of the remote server you wish to link to.
- Specify the SSH key to utilize for authentication. The concise process may vary depending on the SSH client you are employing.
- If you create a passphrase for your key which is private, you will get asked to enter it.
- As soon as authentication is done, you will get linked to the Aremote server securely using your SSH key.
Also Read: How to Install Maven on Windows in just 4 Easy Steps
Conclusion
SSH key generation in Windows 10 doesn’t have to be a complex task. With the help of OpenSSH Client and PuTTY, the process becomes straightforward and accessible for all users. In this blog post, we covered the step-by-step instructions for generating SSH keys using both methods. Additionally, we explained how to utilize your SSH keys for secure remote connections. By following these instructions, you can enhance the security of your network communications and ensure a safe and reliable connection between your Windows 10 system and remote servers. Moreover, you are free to seek Hostbillo experts anytime in case you encounter any difficulty regarding the same.


