Introduction
There are more than 280 CMD commands list available through Windows Command Prompt. Rather than the graphical Windows user interface that we often use, these commands get executed to perform specific operating system functions from a command-line interpreter.
It’s possible to format a whole disk, restore your files, transfer messages to other devices, reboot your computer system, and many other things using cmd Command Prompt instructions. Many Command Prompt tips and techniques make utilization of all of these commands easy.
The main Windows CMD commands list is highlighted in this article, along with practical examples.
Command Prompt Commands
The Command Prompt program is used to execute built-in programs known as commands. The major purpose of CMD commands is to automate a variety of operations, including user provisioning and other repetitive actions.
The most popular Windows CMD (Command Prompt) commands are listed here. For every command, there is a usage sample and a brief description.
1. arp Command
The address resolution protocol (ARP) command displays and updates values in the ARP cache. IP addresses get translated into resolved physical addresses using one or more tables that get stored in the cache.
This command has the following syntax:
The arp command displays the help window in its default state.
The following command should get used to seeing the ARP cache table:
- arp -a
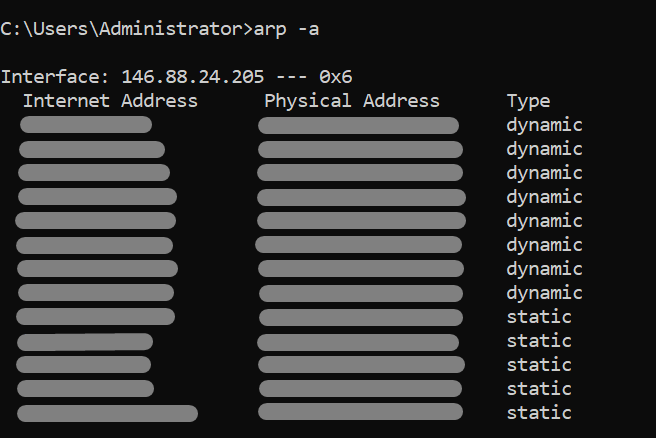
The result displays a command list for CMD of every ARP entry currently in effect, organized by the interface.
2. assoc Command
The system’s links for file extensions get listed and modified by the assoc (association) command. This command has the following syntax:
- assoc .<extension>=<filetype>
The command publishes the existing file extension links when no parameters are provided.
To inspect, edit, or delete file attachments, utilize the assoc command. For instance, launch: to view the associations for the.log files.
- assoc .log
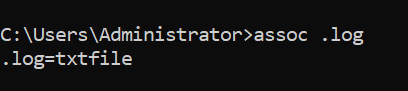
Modify the file associations with:
- assoc .log=txtfile

Instead, you can eliminate all connections to any files with the.log extension by executing:
- assoc .log=

To break apart the linkage, the command needs to be followed by a space following the equals sign.
3. attrib Command
With the attrib (attribute) command, you can view or modify file attributes. The potential attributes seem to be:
- R stands for read-only.
- H stands for hidden.
- S stands for system file.
The attrib command’s structure is as follows:
- attrib <+ or -> <attribute>
A file’s attributes can be set or removed using the plus (+) and minus (-) signs, respectively. The CMD command displays the properties of the files in the working directory when no parameters are presented.
With the commands below, you can make a file read-only (R) as well as hidden (H).
- attrib +R +H sample_file.txt

Disable the hidden (H) option to render file visibility:
- attrib -H sample_file.txt

A file’s attribute gets removed using the minus sign, which also sets the file’s visibility to its initial configuration.
4. the bcdboot Command
By transferring BCD files inside an empty partition, the bcdboot (startup configuration data boot) method generates a system partition.
For this with the command’s syntax, use:
- bcdboot <path>
For instance, perform the following to replicate the BCD files to C:\Windows:
- bcdboot C:\Windows

Verification of file creation gets printed in the outcome.
5. cd Command
The location gets displayed or altered using the cd (change directory) command. This command has the following pattern:
- cd <directory>
Without the supplementary directory parameter, the program publishes the present working directory.
For instance, following the command, add the directory name to update the placement to a directory designated Public:
- cd Public

The prompt displays the updated location in accordance with the change.
The /d parameter must be included before the path to shift the placement to a different disc. Use this as an example to switch to disc S:\
- cd /d S:
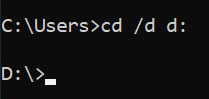
Unless the option gets specified, the command outputs the path rather than switching to the specified destination.
The following shortcut can be used to navigate to the parent directory:
- cd ..

Changes get made to the current working directory, moving it up one directory.
6. the chkdsk Command
Errors get checked for in the local directory system and metadata using the chkdsk tool. The syntax to verify a disc is as follows:
- chkdsk <volume> <options>
The chkdsk command displays the state of the disc without correcting any faults when no further parameters are provided.
The /f option, among others, allows for the correction of disc mistakes.
- chkdsk <volume> /f
That command tries to correct disc problems. Do the inspection the next time the system restarts if the disc is in use. The system will not get impacted if the command gets stopped, but make certain that you execute the scan again later to rectify any potential data damage.
7. choice Command
A user gets prompted by the choose command to select a response from a range of possibilities. The command asks the user to select one of the Y or N alternatives in the absence of any parameters.
Choice quantity and prompt text are controlled by other settings. Utilise /c parameter, for instance, and enter the names of the three options to add a third possibility:
- choice /c ync

Describe the choices that can be selected with the /m argument in more detail by adding more text. Consider this:
- choice /c ync /m “Yes, No, Continue”

This command always gives back the choice index and afterward leaves.
8. cipher Command
The cipher command displays and alters the encrypted communications for files including directories. using the following command syntax:
- cipher <option> <file or directory>
The cipher command displays all files and directories that are in the present location’s encryption status when executed without any further arguments. In contrast to E, which stands for “encrypted,” U stands for “unencrypted.”
With the /e argument, you can encrypt any file located in the current working directory:
- cipher /e <file name>
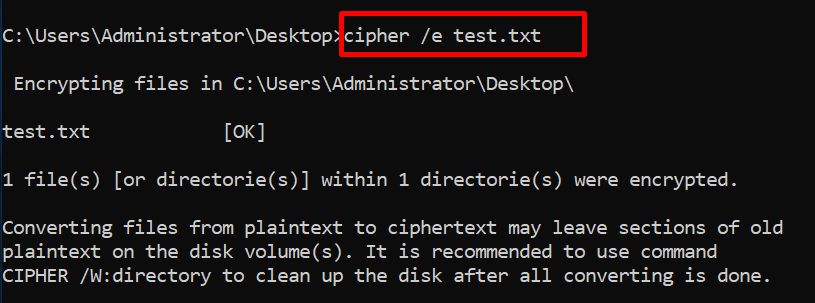
The signal for the file switches from U towards E, indicating that it gets encrypted.
It should be noted that Windows 10 Pro, Enterprise, and Education editions support the ability to encrypt and decrypt folders and files.
9. clip Command
A clip command transfers a command outcome and perhaps a file’s information to the clipboard. In CMD, the following syntax gets used to duplicate a command’s results:
- <command> | clip
For instance, pipe the cd command to clip to replicate the route to the current working directory:
- cd | clip

Use CTRL+V to copy the contents and paste them into any location in the window.
Employ redirection to duplicate a file’s entire content:
- clip < <filename>
Use this command, for instance, to replicate the contents of the file sample.txt to the clipboard:
- clip < sample.txt

The details of the file get copied to your clipboard and are available for pasting wherever you like.
10 cls Command
A blank surface gets produced after the cls command tries to clear the text in a command line window. To remove all content from the screen, utilize the command.
It is important to note that the prior output and contents are not displayed again.
11. cmd Command
The command interpreter gets started completely from scratch using the cmd command.
This command can be executed using the syntax shown below:
- cmd <options> <command>
The cmd command displays the most recent version of the cmd.exe software without any extra parameters.
Cmd command can be used to execute commands while the current cycle is still open. Now use /c parameter, for instance, to evaluate a command and then return to the active command interpreter task:
- cmd /c cd ..
Your directory gets modified by the new interpreter. The /c tag, on the other hand, guarantees that the directory remains unmodified and that the interpreter goes back to the first session.
Use the /k argument to execute a command and continue in the new session:
- cmd /k cd ..

By running the cd command to change to the parent directory, the /k argument transitions to the new session.
12 color Command
Color modifies the backdrop and text colors on the console from their default settings. with the following color command syntax:
- color <background><font>
Hexadecimal numbers ranging from zero to f represent the color characteristics. Each available color choice is shown in the help window:
- help color
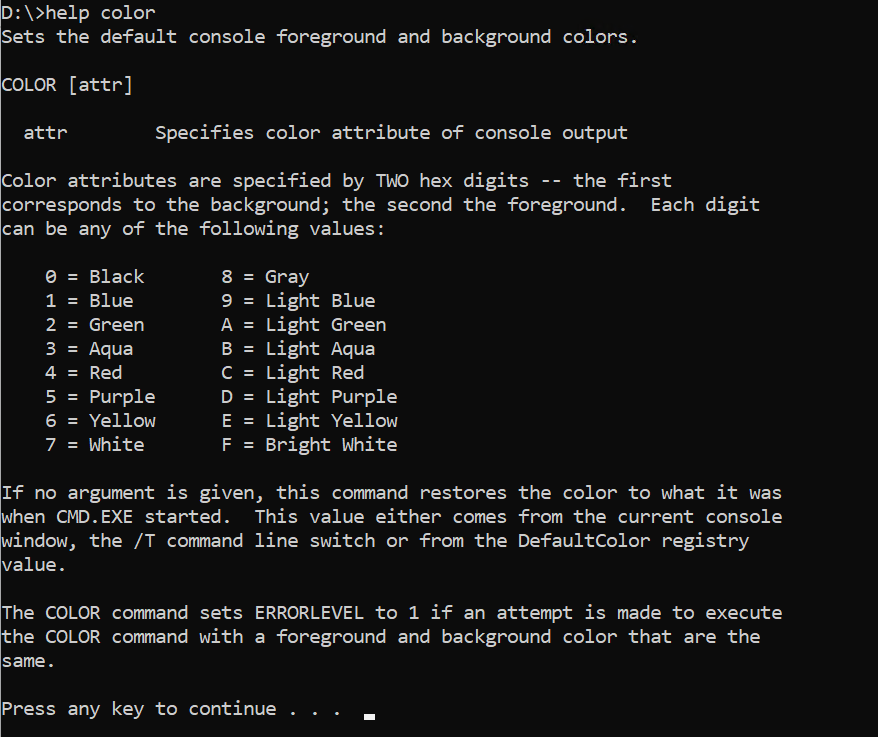
Use the following color command, for instance, to make the backdrop blue (1) and also the typeface light aqua (b):
- color 1b

Use the color command without any parameters to go back to the console’s default colors.
13. comp Command
Comparing the exact contents of separate versions is done with the comp command. While it examines file bytes, the comparator program outputs characters that are different between two files.
This command’s structure is as follows:
- comp <file 1> <file 2> <options>
When the comp command gets run with no arguments, an interactive window to provide file names and other options opens.
Find similar text files that contain the following information to show how the command operates.
- “test” can get found in sample file 1.txt.
- “Text” is present in sample file 2.txt.
Execute the comp command while providing the names of the two files:
- comp sample_file_1.txt sample_file_2.txt
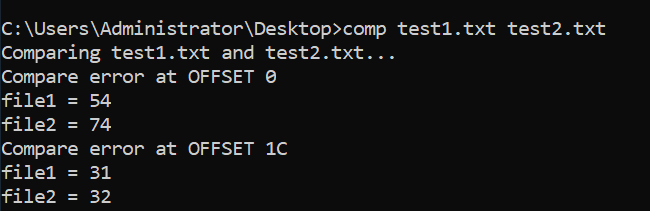
The output requests more file comparisons and displays the comparisons error as hexadecimal characters (enter N to exit).
Now use /a parameter to publish the findings of the comp in a readable layout:
- comp /a sample_file_1.txt sample_file_2.txt
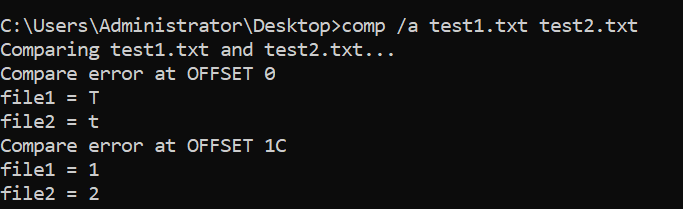
The character “s” from the initial file and the character “x” inside the subsequent file are where the comparison fails.
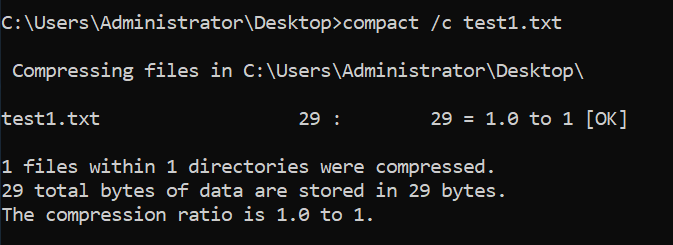
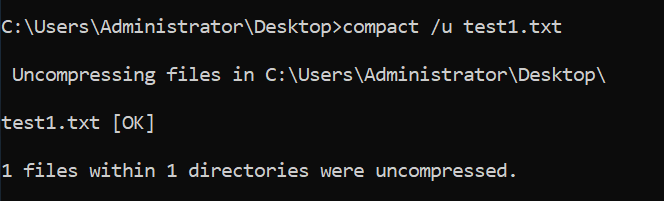
14. compact Command
Files and folders can get compressed using the built-in compact command. Again for the command’s structure, use:
- compact <options> <file>
The compact command essentially provides the directory’s present condition of compression without any variables or arguments.
For instance, you can utilize the /c argument and the following file name to compress a file:
- compact /c sample_file.txt
The /u argument can be used to uncompress a file:
- compact /u sample_file_1.txt
Compress huge files as well as directories with the compact command to free up storage space.
15. copy Command
From one spot to another, documents can be copied using the copy command. given the following command syntax:
- copy <options> <source> <destination>
For instance, use the following to duplicate the content of one file to another in the same location:
- copy sample_file.txt sample_file_copy.txt

By copying the whole contents of the source file into a new file, the command produces a new one.
16. date Command
The system’s current date can be viewed and changed with the date command. The program publishes the date and time and asks for a new date without any additional specifications:
- Date

Update the system’s current date by entering this one as mm-dd-yyyy otherwise press CTRL+C to quit.
If you primarily want to print the date and don’t want to change the system state, utilize the/t parameter:
- date /t

In addition to the current date, the command displays the weekday.
17. defrag Command
Your system’s fragmented files are located by the defrag (defragmentation) program, which also gathers them. By reducing unneeded empty data blocks, this command enhances system performance.
The defragmentation command syntax is as follows:
- defrag <volumes> <options>
Use the following command, for instance, to disk defrag the C: drive:
- defrag C:\ /u /v

Although the /v parameter displays a verbose response, the /u standard prints the activity. You can omit these conditions.
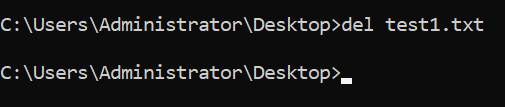
18. del as well as erase Commands
Files can get deleted using the del or erase commands. These commands have the following syntax:
- del <options> <file(s)>
- erase <options> <files(s)>
These instructions completely and utterly and forever remove the desired file or documents from a disc.
Use the following command, for instance, to remove the file sample.txt:
- del sample.txt
You could also:
- erase sample.txt

You should use the /p argument to prevent unintentional deletion:
- del /p sample.txt

The file name gets displayed in a prompt in the output that asks for authorization before eliminating the file.
19 dir Command
The dir command presents all of the files and subdirectories that are present in a directory. For something like this command’s syntax, use:
- dir <drive><path><filename> <options>
All directory information gets displayed using the dir command without any parameters.
Use the following command to display the contents of the C: drive:
- dir C:\

All information below is displayed in the output:
- Volume drive.
- The serial number of the volume.
- The contents of the directory together with the modification time.
- Count the number of files and directories.
20. doskey Command
For the earlier supplied commands, the doskey command launches the Doskey.exe application. This command facilitates the creation of macros and the recall of command history.
For instance, execute: To view the command histories from the present command prompt activity.
- doskey /history

In order of old to new, the output displays every command from the CMD session.
21. driverquery Command
Administrators can view loaded device drivers and related information by using the driverquery command. Both remote access machines, as well as local machines, can use the command.
Its command’s syntax is as follows:
- driverquery <options>

The driverquery command, when launched without any conditions, displays a list of all local machine device drivers. The output format can be adjusted using other settings, and remote machine driver queries are also an option.
22. echo Command
The parameters for the command get managed by the echo command, which also outputs a message to the console. For the command’s structure, use:
- echo <message>
This command displays the present settings when no parameters are provided.
Enter the following command to activate it and display the greeting “Hello, world!”
- echo “Hello, world!”
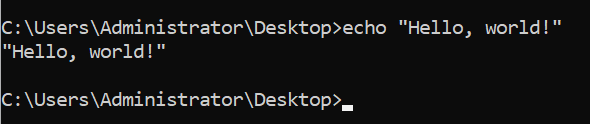
For printing helpful information even when a script is running, the echo command is a common addition.
23. exit Command
A batch script and perhaps even a command interpreter session gets terminated with the exit command. Adding the /b argument will terminate a batch script:
- exit /b

Exit commands shut down command interpreters without the /b argument.
24. fc Command
To compare two or maybe more files, use the fc (files compare) command. When there’s a difference mostly in files, the output publishes the information to the console.
For example, consider the syntax using fc:
- fc <options> <file 1> <file 2>
Use this command, for one, to compare and contrast two files, sample file 1.txt with sample file 2.txt.
- fc sample_file_1.txt sample_file_2.txt
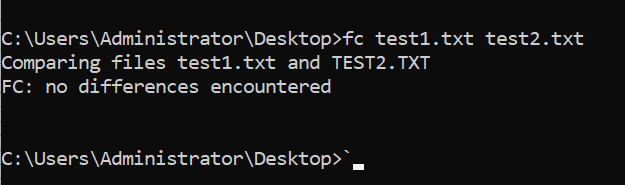
This command outputs the file contents to show that there is a discrepancy seen between the two files.
25. find Command
When a match gets made, the line of text gets printed by the find command after searching for the specified string in the file. Its syntax is as follows:
- find <string> <file>
To find the word “text” throughout a file, as an instance, use:
- find “text” <file>
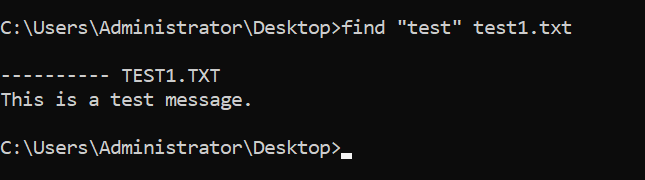
In addition to returning the file name and also the line of text containing the string, this command searches for an exact fit. This command returns the file name only if a file doesn’t have the text in it.
26. The findstr Command
The findstr command is comparable to the findstr (find string) function in what it does. Without including the file name, this command returns the entire line that contains the text. It is now easier to utilize in scripts because of this feature. with the following command syntax:
- findstr <string> <file>
Use the following command, for instance, to locate the string “text” in a file:
- findstr “text” <file>

The string is absent from the document if the command returns no results.
27. ftype Command
An association between a file type as well as an extension can get viewed and modified using the ftype (file type) function. The syntax for this command is as follows:
- ftype <file type>=<open command>
The file type field specifies the file to display or alter (for example, “txtfile”), but the open command alternative is a string that activates a program to determine the file format. When using the offered software, the open command string runs a file by replacing its name in the open command.
Ftype publishes all file categories and association information when no settings get provided.
When viewing text files, enter the following information to see the existing file type & extension association:
- ftype txtfile

Add a (=) sign to the end of the sentence to denote the removal of file type association:
- ftype txtfile=

This command disables the file-opening application and breaks the link between the two.
28. the getmac command
All network cards mostly on the machine or connected to a network have their MAC addresses extracted using the getmac command. Moreover, the command displays the protocols connected to each address.
In terms of syntax:
- getmac <options>
Other choices let you adjust the output display or get extensive information about a local computer. For example, in this case, utilize the following to display the MAC addresses in CSV format:
- getmac /fo csv

With the command, you can examine the protocols on network adapters and also decode the MAC address for a network management tool.
29. help Command
For a particular command, this help command displays extensive data. The help command provides every system command accessible without any variables.
For this with the command’s structure, use:
- help <command>
For reference, execute the following command to access the cd command’s help menu:
- help cd
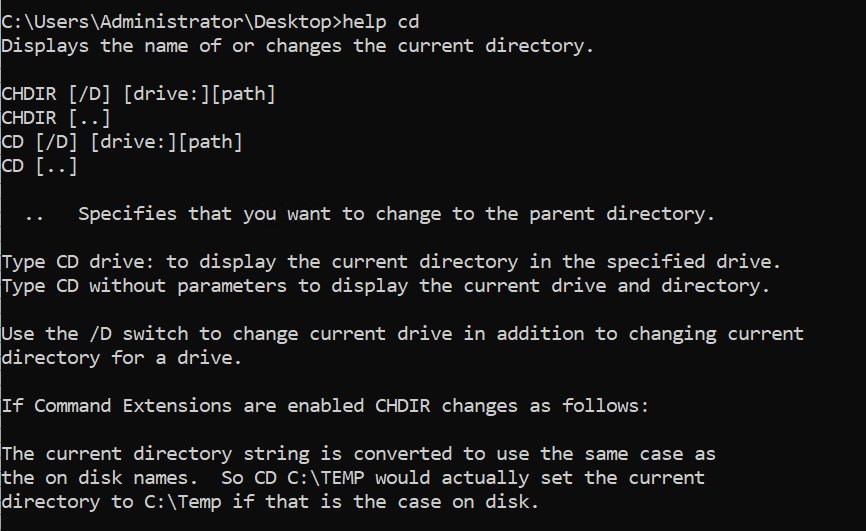
If somehow the help page is bigger than the command line, use any tab to navigate the pages. You can also leave by pressing CTRL+C.
Please take note that the format for displaying the help window for non-system commands is as follows:
- <command> /?

30. hostname Command
It’s easy to see a device’s host name with the hostname command. To find out the computer’s name, enter the following command:
- hostname

As there are no alternatives for the command, adding any further parameters will result in an error. Systems having TCP/IP configured on a network adapter are capable of using the hostname command.
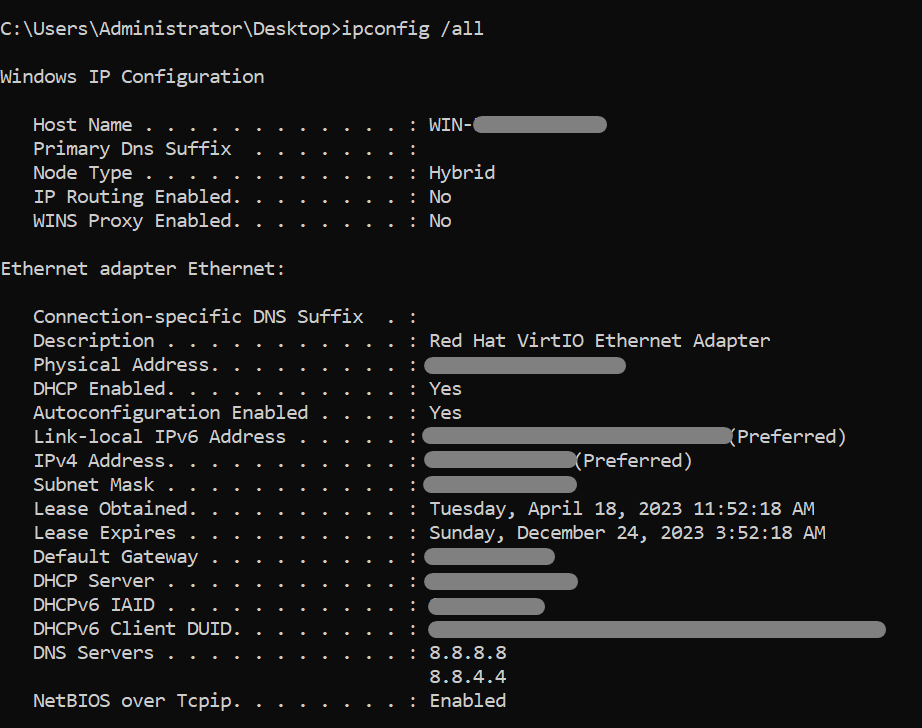
31. The ipconfig Command
One networking CMD utility that displays all present TCP/IP network configuration details is the ipconfig (IP config) command. Besides this, DNS and DHCP settings get updated by the command.
For this with the command’s structure, use:
- ipconfig <options>
The default TCP/IP settings get displayed for all adapters when parameters get left out:
- ipconfig
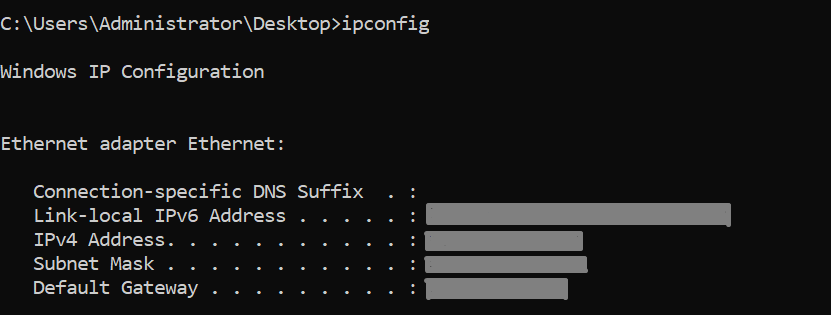
Use the following command to view every adapter’s complete TCP/IP configuration:
- ipconfig /all
Your local area connection’s DHCP IP address should get renewed using:
- ipconfig /renew Local Area Connection
Now use the following to clear the DNS cache:
- ipconfig /flushdns

While resolving DNS problems, just use this command.
32. label Command
A disk’s volume labeling (name) can get seen, modified, or deleted using the label command. To make any modifications, the command needs administrator rights.
This label command displays the C: drive’s label without even any additional options and launches a name-change prompt:
- Label

Try typing a new label name to replace the current one, and otherwise, press Enter to eliminate the label altogether. If you want to preserve the current name, press N instead of Y to accept the change.
33. makecab Command
Cabinet (.cab) files get made with the makecab program. The cabinet file format, which supports lossless data compression as well as archive integrity, is exclusive to Windows platforms.
Making.cab files using the makecab command requires the syntax shown below:
- makecab <options> <source> <destination>
Use the following syntax, for instance, to add a sample file.txt file here to archive but also create a sample cab.cab file in the current working directory:
- makecab sample_file.txt sample_cab.cab

As soon as compression is complete, the output publishes the progress and ends.
34. md or mkdir Commands
By using the md or mkdir (make directory) commands, a fresh directory or subdirectory can be created. with the following command syntax:
- md <path>

- mkdir <path>

Use these commands, for instance, to establish an additional subdirectory in the present location called Subdir:
- mkdir Subdir

A directory tree can get created using md or mkdir according to the command extensions:
- md Subdir\Subsubdir

Any single intermediate subdirectory is promptly created by the command.
35. mklink Command
By using the mklink (make link) function, a hard and symbolic source to a file or directory gets created. The following syntax gets used by the command, which must be run with administrator rights:
- mklink <options> <link> <target>
This mklink command makes a symbolic link to a document without the use of any further parameters. For instance:
- mklink my_link sample_file.txt

The /h parameter can get used to generate a hard link rather than a symbolic link:
- mklink /h my_link sample_file.txt

The /d argument gets used to generate a directory link:
- mklink /d \Docs \Users\milicad\Documents

Inside the directory overview, the dir command displays the links. Now use cd command to navigate to the directory then consider the linked directory as normal (cd Docs).
36. more Command
Longer documents and outcomes can be displayed on a single screen at a time using the more command by this Windows CMD function. Just use a pipe character to specify more with a command:
- <command> | more <options>

To view lengthy files page per page instead, then use the following command:
- more <path>

Take the following example to reduce the output: Execute the help cd command as well as pipe the more command.
- help cd | more

For the next line, click Enter, and to move onto the next page, press Space. Tap Q to leave.
37. mountvol Command
Mount points for volumes can be created, deleted, or displayed using the mountvol command. When a volume gets mounted, the file system will make the data on a storage medium accessible to local users.
Its syntax is as follows:
- mountvol <path> <volume name>
A drive letter is not necessary for linking a volume using the command. Mount points, potential volume names, and even the help menu get displayed by the mountvol command in the absence of any variables.
Just use the following command, for instance, to see the drive Cvolume :’s name but also the current mount point:
- mountvol C:\ /l
The volume’s GUID—a distinctive, permanent identifier—is displayed in the output.
38. move Command
Shifting files from one spot to a different one may be done with the move command, which is part of the CMD shell command. Again for the command’s syntax, use:
- move <options> <source> <destination>
A folder or perhaps a file might be the origin or the destination. When a file’s both starting and ending locations are identical yet its name differs, the move command renames that file.
As an experiment, this command can rename a file called sample file.txt to file.txt:
- move sample_file.txt file.txt

To transfer a file to a different location, use the full path:
- moveC:\Users\Public\Downloads\my_file.txt C:\Users\Public\Desktop\my_file.txt

Whenever a command gets executed in the context of a batch script, it will not ask for confirmation whether it’s overwriting an existing file.
39. The msiexec Command
To install, manage, and uninstall .msi software packages, the msiexec application runs the Windows Installer program. The syntax for the command is as follows:
- msiexec <options> <path to package>
Several installations, displaying, upgrades, and repair options are available in the software. The msiexec command, when run without any arguments, launches a window displaying command details.
Follow these instructions, for instance, to complete a standard installation of a.msi package:
- msiexec /i “C:\example.msi”
When the /i option gets used, the.msi package at the specified location will get installed normally.
40. The msinfo32 Command
Your system information window is displayed when you run the msinfo32 command.
Its syntax is as follows:
- msinfo32 <options>
Also available Filter the data as well as export it in a particular file format. For instance, perform the following to export all system data to an.nfo file:
- msinfo /nfo sysinfo.nfo
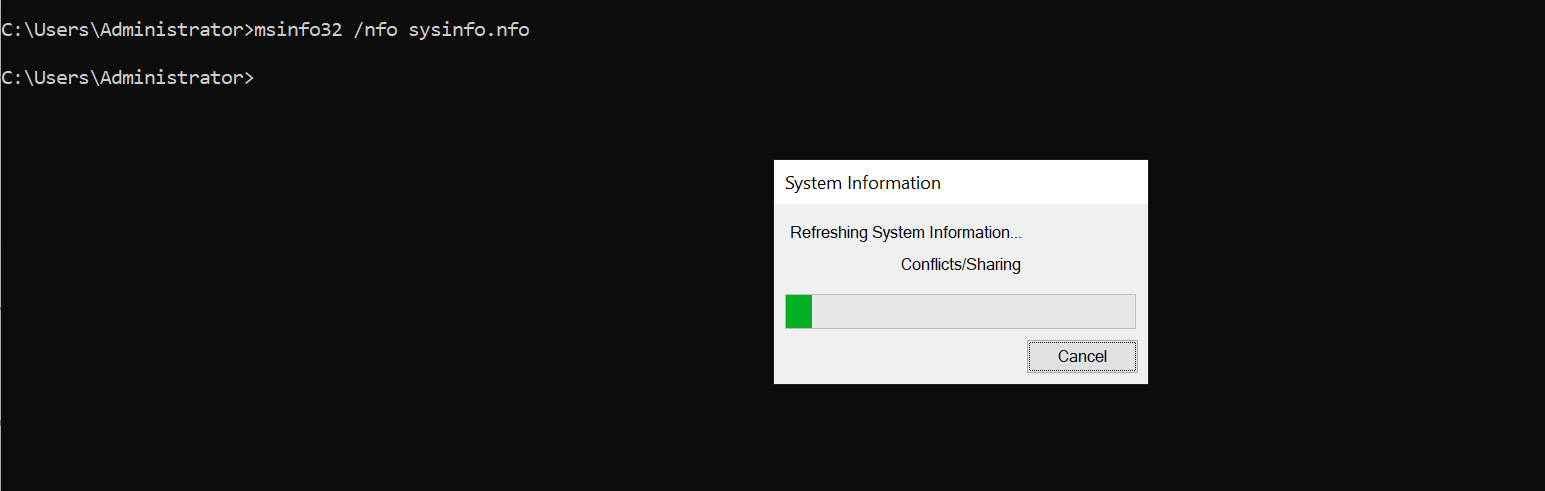
Whenever the.nfo extension is not included, the program automatically adds it.
41. mstsc Command
To establish a connection to a distant system, the mstsc command launches a Remote Desktop Connection (RDC) application. Make changes to an existing one.rdp document or establish a remote connection with the command.
The syntax for this command is as follows:
- mstsc <options> <file>
Use the following command, as it will begin an RDC session in full-screen mode:
- mstsc /f
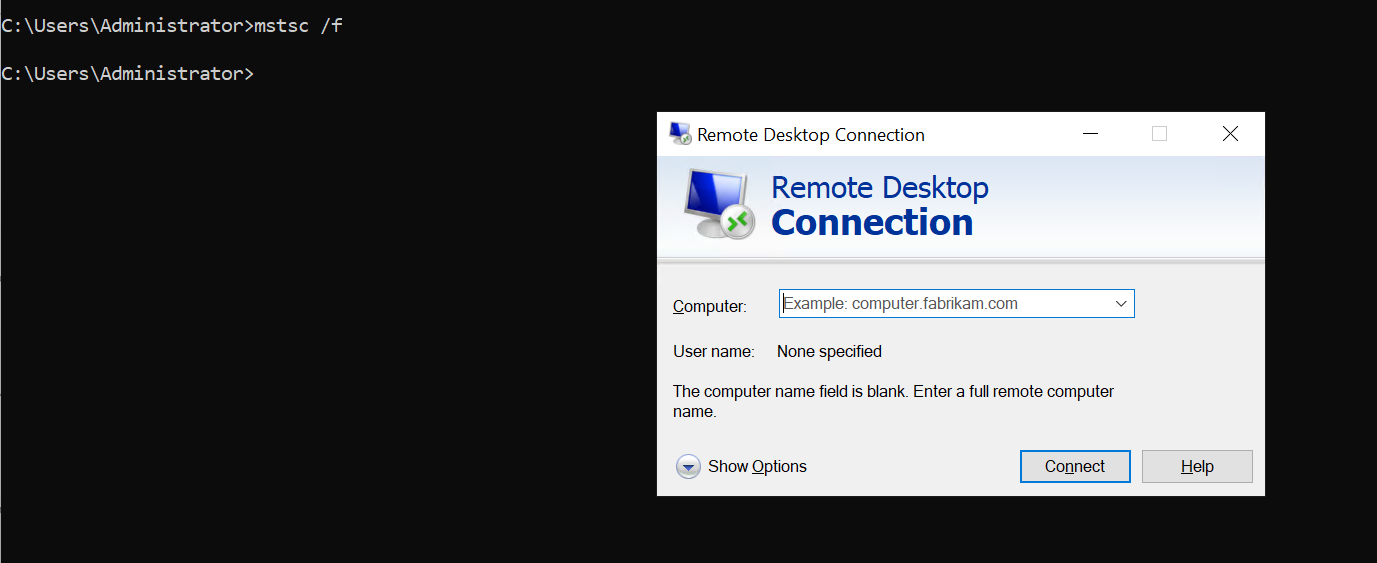
With the /edit parameter and also the specified file name, you can edit an existing connection:
- mstsc /edit example.rdp
Your Documents folder is the default location for user-created.rdp files.
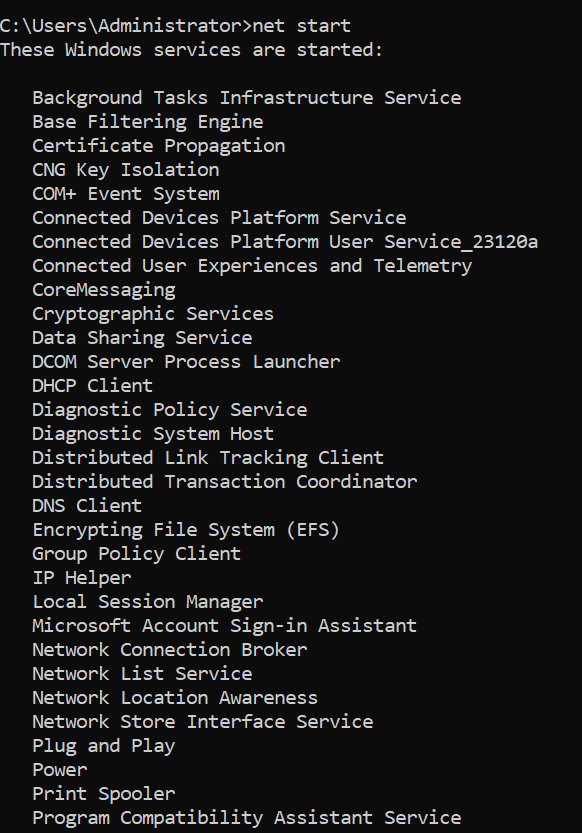
42. net Commands
So several network components, including users and network services, can be managed using the net commands collection of commands.
Its syntax is as follows:
- net <subcommand> <options>
The net command displays a list command in CMD of all possible subcommands along with a brief overview in the absence of any additional parameters.
To view a list of all currently active Windows services, type net start:
- net start
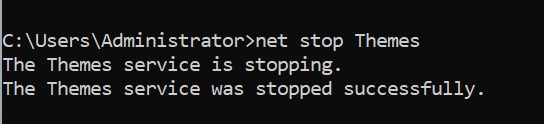
Use the next command to terminate a service:
- net stop <service>
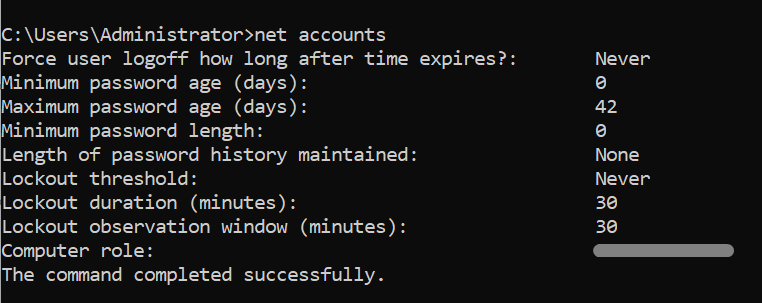
The following will let you look at a user’s password and username requirements:
- net accounts
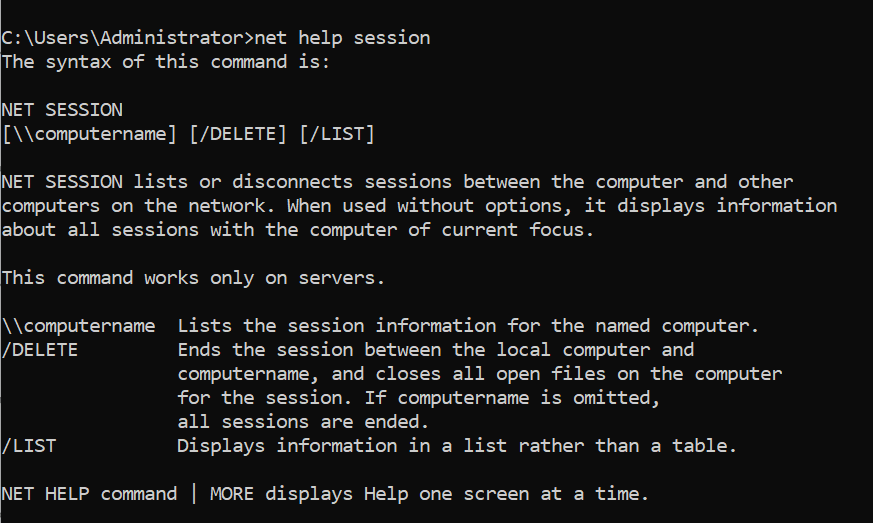
Use the syntax shown below to show more information for a subcommand:
- net help <command>
The output displays a thorough help box for each command that got entered.
43. netstat Command
One of the most important commands for network managers is netstat (network statistics). Users can check various network statistics with the command.
Here is the command’s fundamental syntax:
- netstat <options>
Although used without any arguments, this command displays TCP connections that are currently open. The protocol, domestic and international addresses, and also TCP connection conditions are displayed in the output.
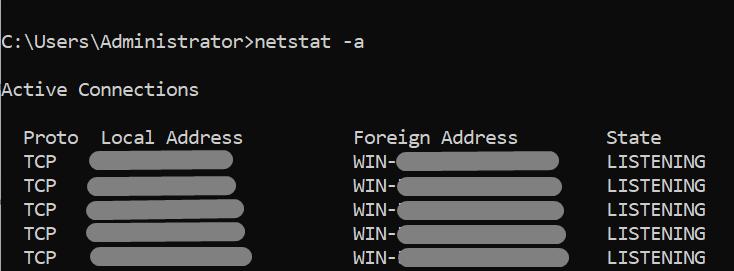
Add the -a parameter to see all TCP connections that are open as well as ports that are listening for TCP and UDP traffic:
- netstat -a
To verify the port protocol type or perhaps to look for open ports, use the command.
44. The nslookup Command
A utility for web servers to diagnose DNS infrastructure gets called nslookup. This command includes both a non-interactive version for searching a single data point and also an interactive mode when finding more information. nslookup has the following syntax:
- nslookup <host> <command> <options>
When given no parameters, nslookup switches to interactive mode. Use this step to find the DNS entries for a particular domain name:
- nslookup <domain>
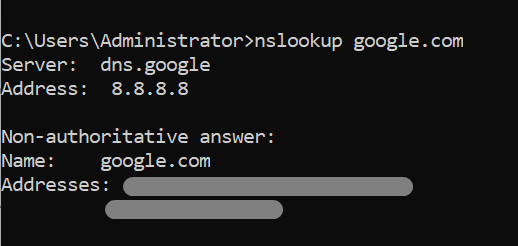
For the given domain, the result displays the A records.
45. path Command
Directories can be added here to the PATH environment variable using the path command. Many folders that lead to executable files get contained in the variable.
The syntax of the command is as follows:
- path <location>

The PATH variable’s current situation gets displayed by path when no parameters are provided.
Using a semicolon (;) will allow you to add several locations to PATH as shown in the case below:
- path <location 1>; <location 2>

This variable gets added at both places.
46. ping Command
A whole other crucial tool for network troubleshooting would be the ping command. By issuing ICMP request messages, this command verifies connections with another system.
Again for the command’s structure, use:
- ping <options> <host>
For instance, just use the following to see if you can access the hostbillo website:
- ping hostbillo.com
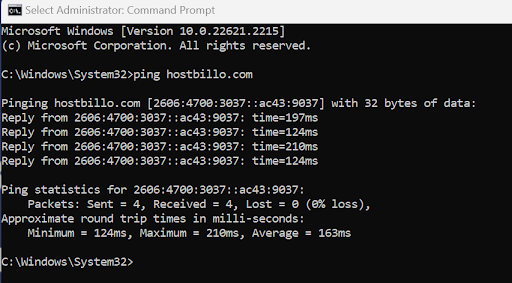
Both the round-trip durations and accompanying reply messages get printed in the outputs. You can use this command to see whether there are any connection or name-determination problems.
Also Read: How to Ping a Specific Port Number in Linux & Windows?
47. The powercfg Command
Powercfg.exe, an application for managing the system’s power strategy, gets launched by the powercfg (power config) command. A device’s battery efficiency as well as energy efficiency issues can be resolved with the aid of the monitoring platform.
Its syntax is as follows:
- powercfg <options> <arguments>
Use this to display a device’s present energy plan configuration:
- powercfg /list
Every power plan on the system gets listed in the output. There is a star (*) next to the current power scheme.
48. prompt Command
By using the prompt command, you can modify the CMD prompt displays to present the desired string. The position and greater-than symbol (>) are displayed in the prompt by default.
Its syntax is as follows:
- prompt <string and variables>
To add unique characters and perhaps extra features to the prompt, this effective and timely command provides many variables. If you want the prompt to be an arrow, for instance, use:
- prompt –$g
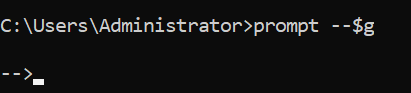
The command-line session’s prompt remains and therefore gets represented by the $g variable by the greater-than sign (>).
49. rd & rmdir Commands
An empty directory gets deleted from the system using the rd & rmdir commands. These commands have the following syntax:
- rd <path>

- rmdir <path>

There is a notice when you try to erase a directory that contains files. To get rid of a directory that has files including subdirectories, add the /s argument.
- rd /s <path>

All items and the whole subfolder tree get deleted by the command.
50. ren & rename Commands
Renaming directories or file names is possible with the ren & rename commands. These two instructions have the following syntax:
- ren <path><old name> <new name>

- rename <path><old name> <new name>

These commands don’t let you move the files to another location. Many files can be opened using wildcard characters. To convert all.txt files to.c file types, for instance, use:
- ren *.txt *.c

An asterisk (*) character decided to rename any documents with the.txt extension inside the current working directory and helps to determine all of them.
51. The robocopy command
For duplicating directory structures and files, a robocopy command is a powerful tool. This command has the following syntax:
- robocopy <source> <destination> <file> <options>
Robocopy’s /mt parameter providing higher-performance multithreading is its key advantage. You can resume a transfer if it gets interrupted by using the /z argument as well.
A sample transfer would look like this:
- robocopy C:\Users\user\Downloads C:\Users\user\Documents database.db /mt /z
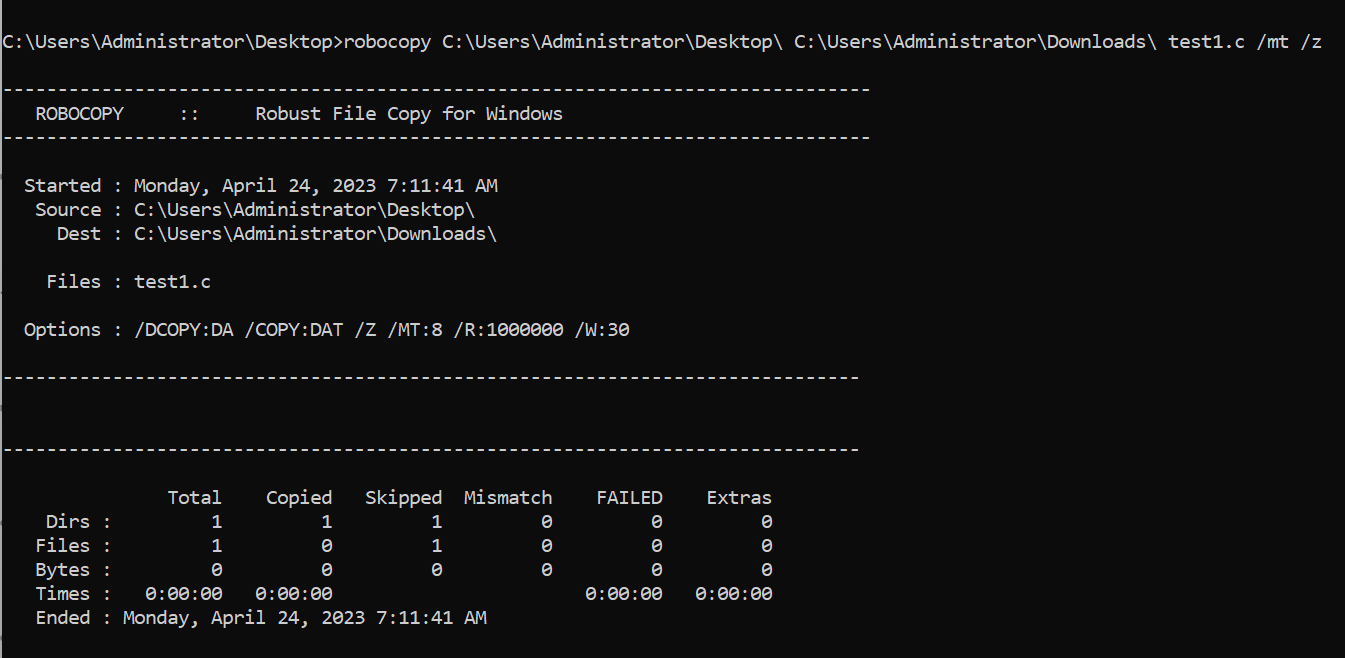
To avoid disruptions during massive file transfers, just use this command.
52. route Command
Inside the local routing table, a route command displays and modifies entries. Its syntax is as follows:
- route <options> <command> <value>
These various commands that are possible are as follows:
- add – Inserts a new route entry into the table.
- change – Adjusts an admission inside this table.
- remove – Eliminates a pathway from the table.
- print – Showcases a pathway as well as routes.
To print every path from the table, for instance, utilize this:
- route print
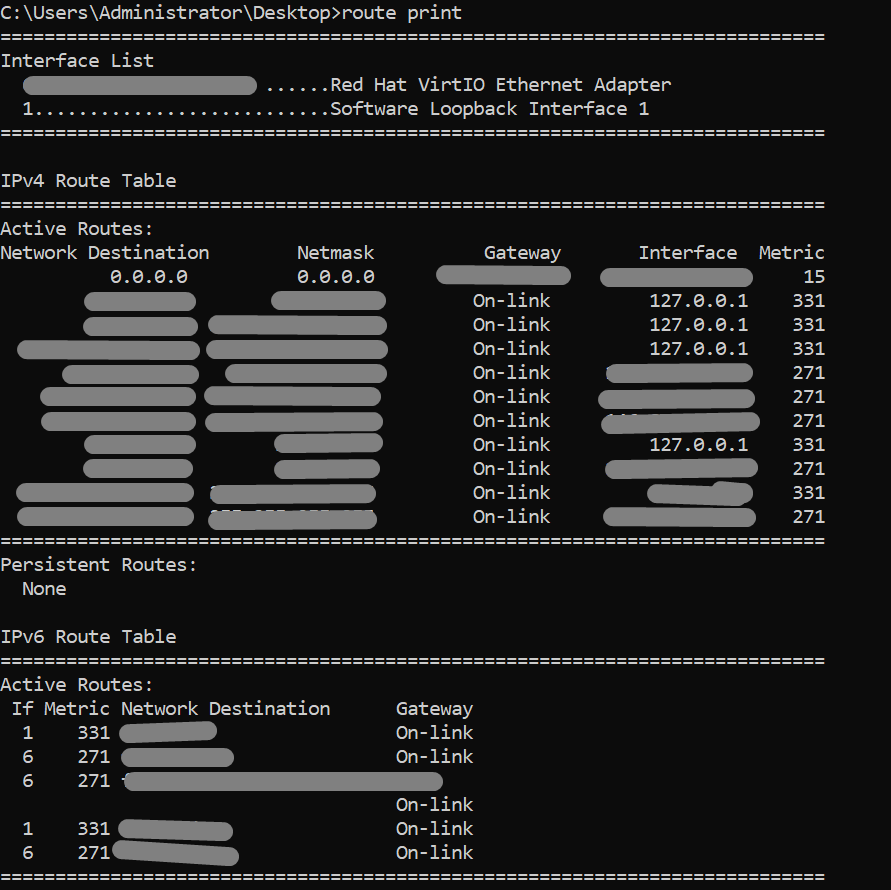
Further to the IPv4 as well as IPv6 routing databases, this output includes an interface list.
53. schtasks Commands
A schtasks command assists in setting up the system’s execution of particular commands and applications. The activities get carried out continuously or at predetermined periods. These are the commands’ syntaxes:
- schtasks /<subcommand>
You have the various subcommands freely accessible:
- change – Alters current characteristics of activity.
- create – Generates a fresh activity.
- delete – Disposes of an activity.
- end – Terminates a program that a function has started.
- query – Screens previously planned activities on the device.
- run – Launches a scheduled operation.
With the following syntax, you could display the system’s current task schedule:
- schtasks /query
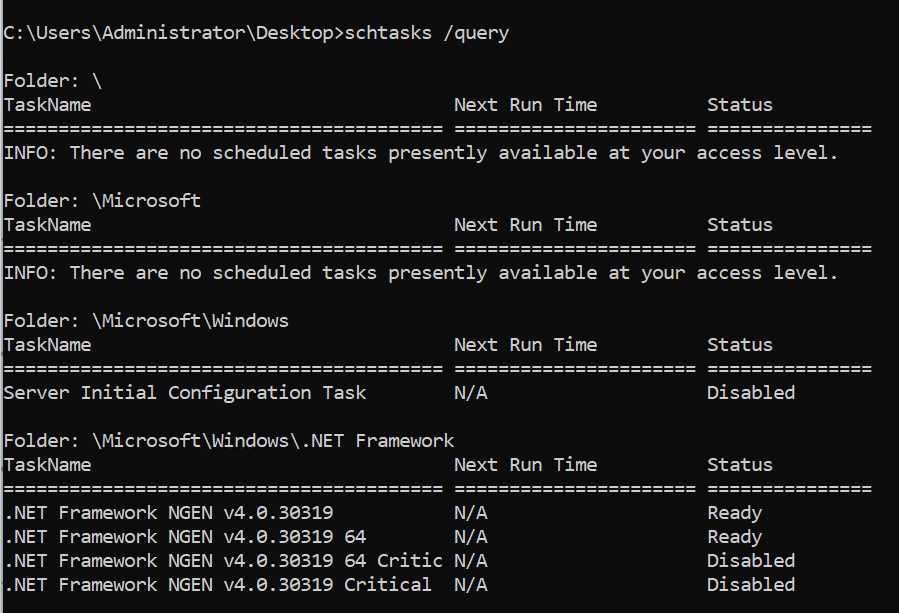
Task titles, upcoming run timeframes, as well as task conditions get shown in the outputs.
54. set Command
Environment parameters inside the CMD can be viewed, modified, and deleted using the set command. Also for the command’s structure, use this:
- set <variable>=<value>
The set command displays all environment variables even when no additional parameters are provided.
You can utilize these parameters with any command. For example, in this case, use the following to create an entirely new CMD variable named message:
- set message=”Hello, world!”

The following syntax gets used to reference the variable:
- echo %message%

This variable’s value gets collected and printed to the screen when it gets encased mostly in percent signs (%).
Remember that perhaps the variables are only effective for the present command-prompt sessions and will not continue.
55. sfc Command
Administrators can verify the integrity of the secured file version using the sfc (system file checker) command. Incorrectly overwritten secured files are also replaced by the right file version using the command.
This command has the following syntax:
- sfc <options> <files or directories>
Just use the command prompt, for instance, to check the system as well as fix all files:
- sfc /scannow
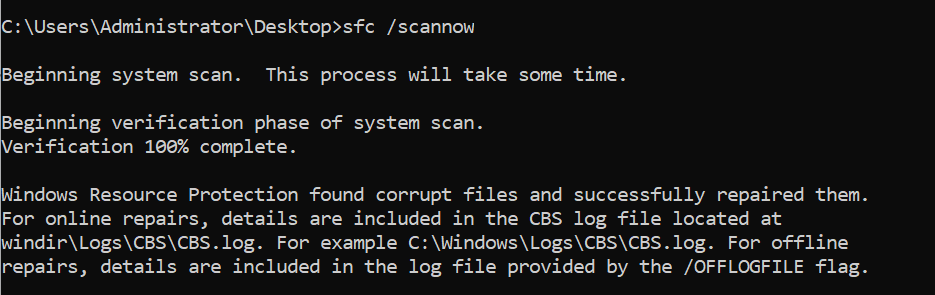
Whenever appropriate, the command fixes faulty files after scanning all secured system files.
56. shutdown Command
Only with the shutdown command, does a remote or locally located computer get restarted and perhaps shut down. Its syntax is as follows:
- shutdown <options>
A shutdown command launches the help panel with no inputs.
Use the /r option, as an example, to turn off and restart your machine:
- shutdown /r

Make use of the /s parameter to shut down before restarting:
- shutdown /s

The shutdown is also not abrupt in either condition. Utilise /a option to cancel the operation:
- shutdown /a

By selecting it, a shutdown command that was previously executed gets guaranteed to cancel.
57. sort Command
A file’s contents including user input can get sorted using the sort command. Both the sorting process and the starting point can get controlled by additional variables.
Always do the following actions to execute the command interactively:
1. Perform sort without even any settings.
2. Fill each line with a brand-new term.
3. To order the input variables alphabetically, enter CTRL+Z then Enter only at the end of the list.
In the meanwhile, just use the files command sort:
- sort sample_file.txt

These file contents get sorted by the command, which also publishes the results to the terminal.
58. start Command
Depending on the selected settings, a start command launches a new command-prompt window. Its syntax is as follows:
- start <title> <options>
Set up a fresh command-prompt session, for instance, and type “Hello, world!” while setting the route to C:\. execute the command below:
- start “Hello, world!” /d C:\
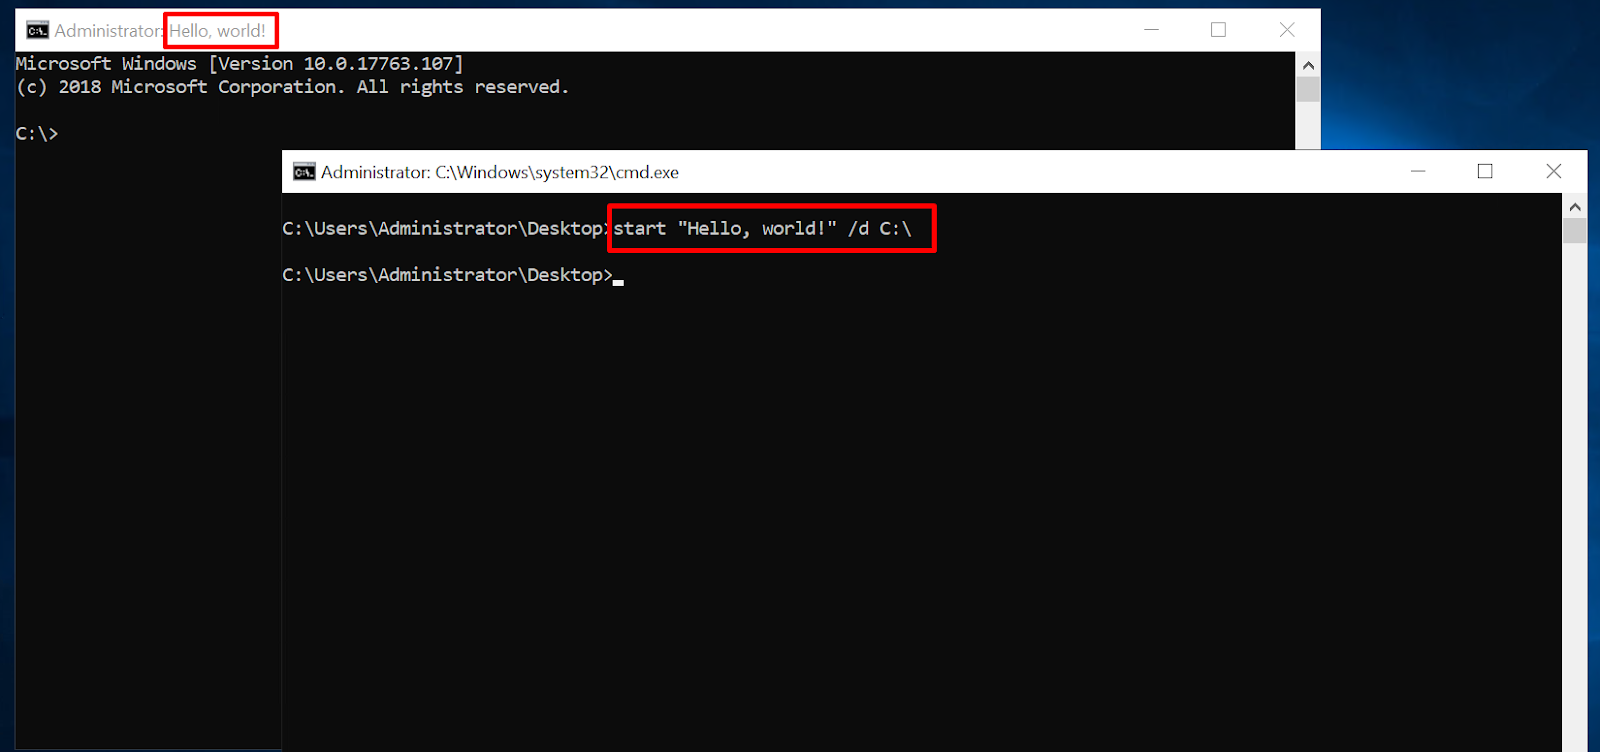
Your C: drive’s starting path and then a personalized window title appears when you launch CMD.
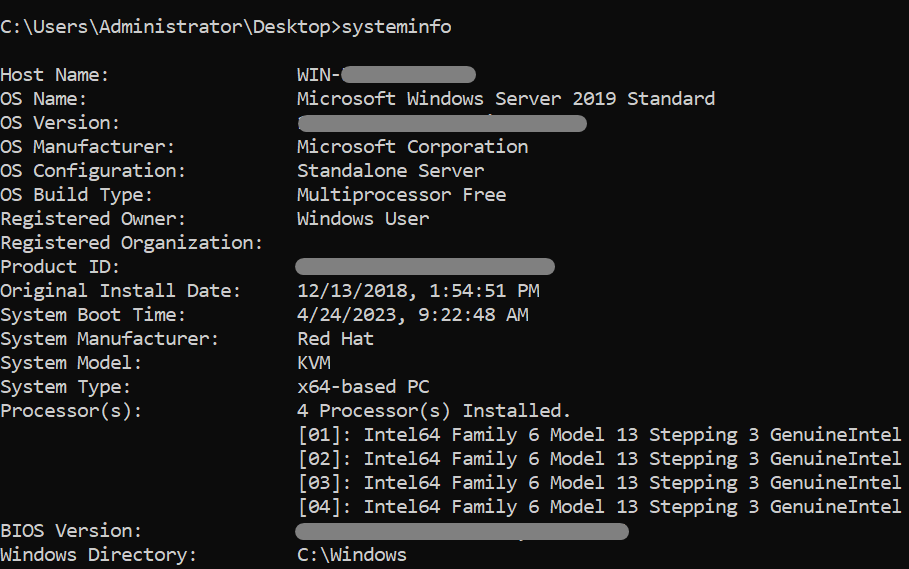
59. systeminfo Command
Detailed system additional data about the operating system and device, especially hardware properties, typically gets displayed by the systeminfo command. On local and distant devices, this command seems to be functional.
To display the locally relevant data, just use the command without any choices:
- systeminfo
Also, you can choose to adjust the output format and sometimes examine the system details for distant computers. For reference, display the CSV format result along with
- systeminfo /fo csv
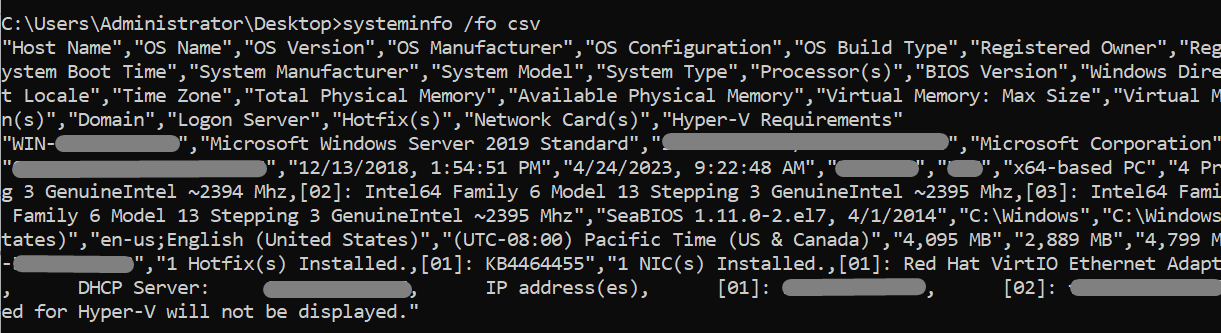
Various formats make it possible to properly interpret the data using scripts.
60. takeown Command
Claiming ownership of a file is possible with the takeown (take ownership) command from an administrator account. An administrator gets ownership of the file and provides access to it using the command.
Add /f to the command line and provide the file name:
- takeown /f <file>

Nowadays, this file’s administrator has complete control.
61. taskkill Command
Any running function or activity on a Windows system gets terminated using the taskkill command. Use this command to kill activities and processes that didn’t finish properly forcibly.
Again for the command’s format, use:
- taskkill <options> <task or process>
To finish a job, use the tasklist command to determine the process ID (PID), then terminate the process using this:
- taskkill /pid <Process ID>

By using its ID, the command locates and ends the process.
62. tasklist Command
On some kind of local or remote machine, the tasklist command displays all currently active processes along with their memory utilization. It assists in finding and referencing particular procedures.
Tasklist has the following syntax:
- tasklist <options>
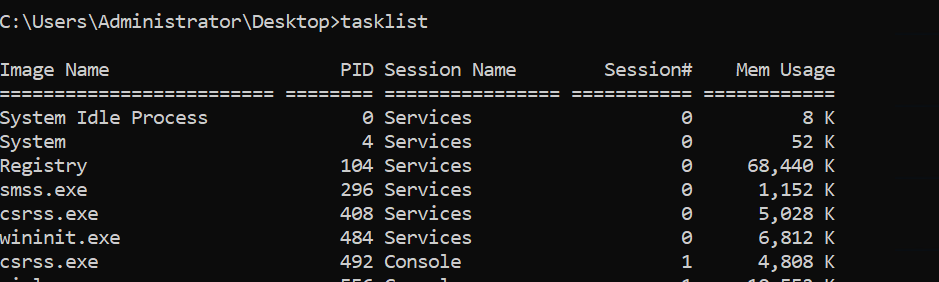
This command displays all active processes when no extra options are presented.
A process’s PID plus image name serves as personally identifiable information. Overall memory utilization for a process is displayed in the last column. This is a useful metric for spotting system-slowing operations.
Also Read: How Can I Check Memory Usage in Linux?
63. telnet Command
Windows has a tool for two-way CLI communication called telnet. To provide an interactive channel of communication but also send messages, this tool makes use of the Telnet protocol.
This command has the following syntax:
- telnet <command> <options>
64. time Command
A time command controls and presents the system time at the moment. The command reports the present time and requests that a new time get entered without even any possibilities:
- time
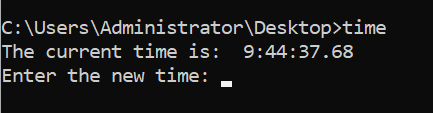
If you want to reset the system time, set a different time, or press CTRL+C to close the box. To prevent adjustments, just use /t choice:
- time /t

So before returning to the command line, this command displays the time.
65. timeout Command
A timeout command stops the command line for the number of seconds that get supplied. This command has the following syntax:
- timeout /t <seconds>
Use the following command, to halt the interpreter for 10 seconds:
- timeout /t 5

After a countdown, the command line gets accessed in the output. To end the timeout sooner, simply press any key. To wait for the transmission of two commands, just use the command in the scripts.
66. title Command
Editing the title of the command prompt is as easy as using the title command. As for the syntax:
- title <string>
For reference, utilize the following to make the title “Hello, world!”
- title “Hello, world!”
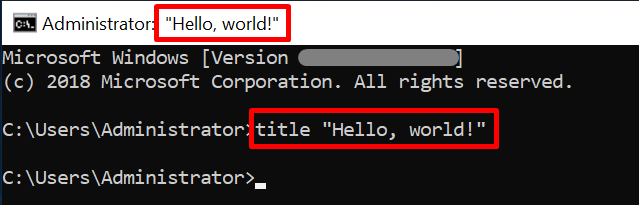
With the supplied string, your CMD window’s title gets updated. If you want to distinguish between several command prompts while running several batch scripts, you should use this command.
67. tracert Command
Networking software called tracert (traceroute) can be used to find the route taken by a local computer to reach a distant location. For the purpose of mapping the routers along the path, the command transmits ICMP packets with rising TTL values.
Tracert has the following syntax:
- tracert <options> <destination>
To find the route to hostbillo.com, for example in the case, employ:
- tracert hostbillo.com
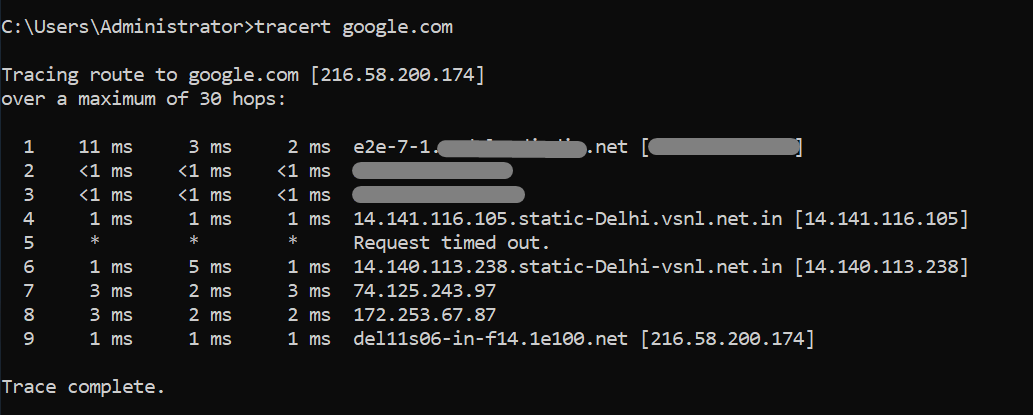
You might also use the destination’s IP address.
An IP address, as well as name resolution, gets provided when necessary, and the output displays the hops made between the source and destination. To find connectivity problems with a host, use this command.
68. tree Command
Every content of a disc or directory gets shown in a tree-like form with the tree command. As for the syntax:
- tree <options> <path>
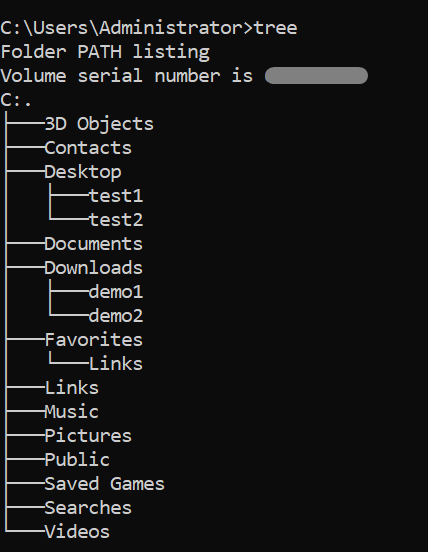
This tree command shows the directory layout of the C: disc when no arguments are presented.
69. type Command
When displaying file contents, you can use a built-in command called type. Without changing the content, this command enables direct file access in CMD.
Its type command’s structure is as follows:
- type <file path>
Use the following command, for example when trying to display the information in the sample file.txt file.
- type sample_file.txt

This command line receives a printout of the file’s contents. For viewing files right in the command prompt, then use this command.
70. tzutil Command
A tzutil command, which stands for “time zone utility,” aids in changing and displaying the system’s presently selected time zone. This command displays a help box when given no arguments.
The time zone will get shown by:
- tzutil /g

The time zone ID gets displayed in the output. full list of all time zone identifiers that are currently available
- tzutil /l | more

Long outputs can get shortened using the more command. For the system time zone to get changed, just use /s argument as well as the time zone ID.
71. ver Command
To display the version of the operating system, use the ver command, which is an uncomplicated program. Determine the precise operating system version by using the following command:
- ver

After printing the outcome, the version goes back to the command prompt.
72. vol Command
Volume plus label information gets printed using the vol command. Again for the command’s syntax, use:
- vol <drive>:
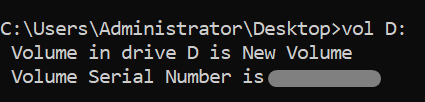
The vol command displays data for the drive that is presently get chosen if no drive gets supplied.
73. where Command
A search pattern gets used where the command to locate a file’s location, and also the location gets printed to the command line. For the command’s structure, use:
- where <options> <location to search> <file name>
When the destination gets omitted, the current directory gets searched for the file without exploring subdirectories. Add a /r argument to run the search in recursive mode. Consider this:
- where /r C:\ sample_file.txt

The command looks through all directories and files on the C: disc. If somehow the file gets located, the command returns the path to the location.
74. whoami Command
Whoami displays the username as well as the domain of the currently logged-in user. This command has the following syntax:
- whoami <options>
This command displays the domain with the user name from its default state.
To provide extensive information for the user account, add the /all parameter:
- whoami /all
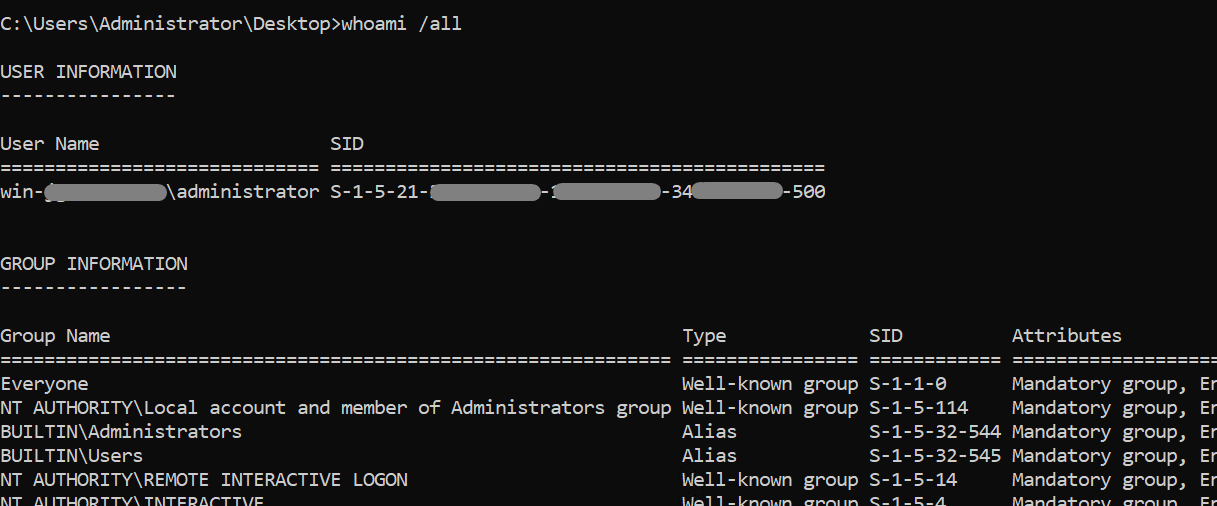
The console prints the user’s identity, protection ID, groups, or rather privileges.
75. xcopy Command
Documents, folders, and subdirectories can be moved between two locations with the xcopy command. This command has the following syntax:
- xcopy <source> <destination> <options>
To replicate information from one spot to the next, incorporating subdirectories (especially if they are empty), just use this command line interface:
- xcopy <source> <destination> /s /e

Although /e supports unused directories, a /s argument enables subdirectory duplication. While overwriting, this command prompts to see whether any files that share the exact name already exist in the location.
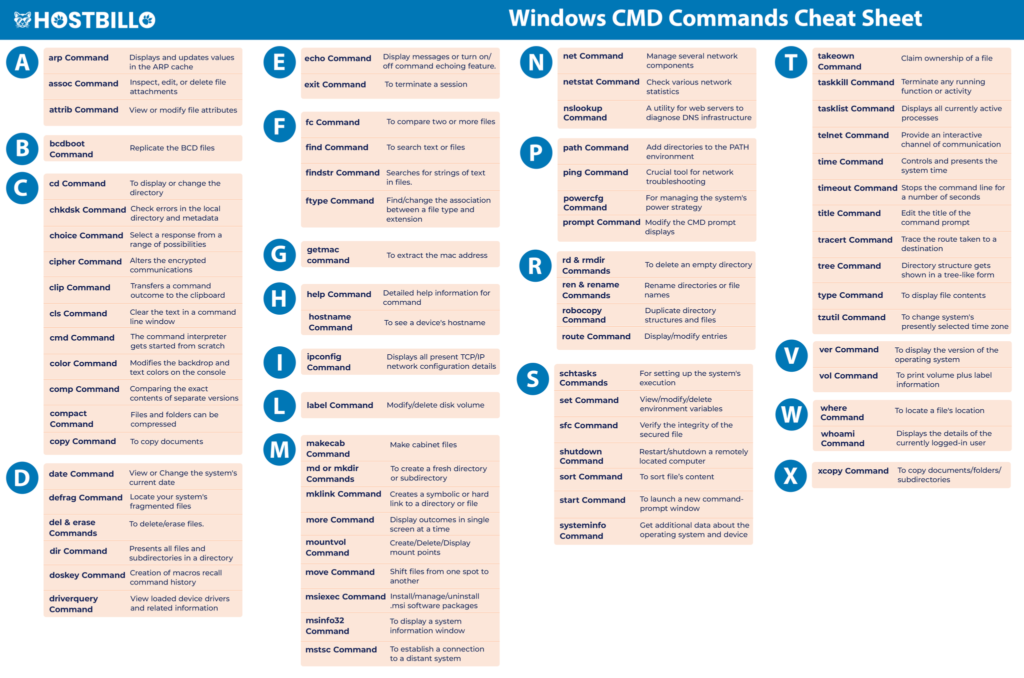
Windows CMD Commands List Cheat Sheet
In the article above you have learned 70+ Windows CMD Commands. Here, we have combined all those commands in the form of a cheat sheet. You can download this Commands List for CMD by pressing the button below.
Conclusion
You’ve become familiarized mostly with the Windows CMD Commands List after reviewing and practicing the commands from this user guide. With these essential commands, Windows’ command prompt can be navigated to complete many things.
To understand Windows’ Command Prompt, keep on going and constantly continue practicing more commands.


