
Introduction
Node.js serves as a JavaScript runtime for server-side programming. It enables the developers to construct scalable backend functionality with the utilization of JavaScript, a language numerous users are already acquainted with from browser-based web development. Under this guide, you will acquire insights into how to install node .js on Ubuntu 20.04 with the three different methods. But before we discuss these methods further, let us highlight the prerequisites for the same.
System Requirements
Before you install the updated node version on Ubuntu, you must make sure to acquire all the necessary knowledge. Also, you need to ensure the download of all the essential installation files & elements. Moreover, the following are the hardware & software prerequisites before you install node.js in Ubuntu –
Hardware Requirements
- Your machine may not possess a complex hardware configuration but it has to be compatible.
- There must be a stable hard drive for Node.js to operate.
- Virtually all modem computers can run Node.Js, including miniature computers like BeagleBone or Arduino YÚN.
- Your system’s Random-Access Memory (RAM) should be at least 4GB.
- Your system storage should be at least 256GB of Hard Disk Space.
Software Requirements
- Your web browser must be intact. Any browser such as Mozilla Firefox, Google Chrome, Microsoft Edge, etc. can run Node.js.
- Your OS must be authentic as well as free. It must possess an Ubuntu server installed with a non-root Sudo user & firewall.
3 Methods to Install Node.js on Ubuntu [Step-by-Step]
![3 Methods to Install Node.js on Ubuntu [Step-by-Step]](https://www.hostbillo.com/blog/wp-content/uploads/2023/06/2-22.png)
Method 1 – Installing Node js from the Default Ubuntu Repository
You can find the version of installing Node.js in the default repositories of Ubuntu. The repositories help you deliver a consistent experience in multiple systems. You must note that here we are installing the 10.19 version of Node.js on Ubuntu. This is not the latest version but offers stability for prompt experimentation with the language.
Step 1
To install node.js in Ubuntu here, you can make use of the apt package manager. You need to first refresh your local package index:

Step 2
In the next step you have to install Node.js:

After executing the command, you can verify if the installation was successful by querying the node for its version number:

With this command, you must acquire the output as:

Step 3
If your necessities are met with the package in the repositories, this is all you require to do to set up Node.js. However, in many cases, you may need to install npm as well, the Node.js package manager. This can be done by installing the npm package with apt:
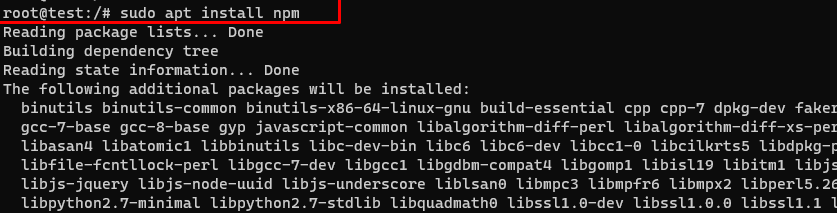
By executing this last step, you get the possibility to install modules & packages that you want to employ with Node.js.
Method 2 – Install Node .js using a Nodesource Repository
This method allows you to install a different version of Node.js. Here you have to make use of a PPA (personal package archive) retained by NodeSource to install node.js on Ubuntu. These PPAs let you choose among more versions of Node.js available than the official Ubuntu repositories do.
Step 1
In the first step, you need to install the PPA for acquiring access to its packages. You can employ curl from your home directory in order to retrieve the script of the installation for your desired version. Further, you must ensure to replace 16.x with your chosen version string (in case different):


You may refer to the NodeSource documentation for gaining more details regarding the available versions of Node.js.
Step 2
In the next step, you must review the download script contents either with nano or your desired text editor:

Once you get satisfied with the secure working of the script, you can exit your editor. Then, you need to run the script with sudo as:

Step 3
By this step, the PPA will get added to your configuration. At the same time, your local package cache automatically remains updated. Now, you get the possibility to install node.js in Ubuntu in the same way as discussed in the previous segment:

Step 4
In the last step, you must verify the installation of the new version of node.js with the help of running node:
After executing this command, your output must come as:
You must note here that the NodeSource nodejs package comprises both the node binary as well as npm, so you are not required to install npm separately.
Method 3 – Installing Node.js using nvm (Node Version Manager)
Under this method, you will learn how to install node js on Ubuntu and manage multiple versions of Node.js with the utilization of Node Version Manager. This method is actually flexible.
Step 1
In the first step, you need to install NVM on your Ubuntu 20.04 machine from the project’s GitHub page. On this web page, you have to copy the curl command from the README file displayed on the main page. This helps you obtain the latest version of the installation script. Also, it is wise to audit the script prior. This can be done by extracting the | bash segment at the end of the curl command:

You can then review the script and ensure that you do not have any issues with the modifications the script is making. In case you are not satisfied, you must run the command again | bash appended at the end:

This leads to the installation of the nvm script to your user account. For employing it, you need to first source your .bashrc file:

Step 2
In the second step, you can check the available versions of Node:


After executing this command, you receive the output of a very long list. You can then install a Node version writing in any of the release versions listed. For illustration, to acquire version v14.10.0, you can execute:

Step 3
In the last step, you can have the possibility to see the diverse versions you install by listing all of them with the help of a command:

Also, you can switch between installed versions with Node Version Manager by implementing the command:

Also Read: Check Python Version in Linux, Mac, & Window
Advantages of using Node.js on Ubuntu

The below-mentioned listed are some excellent benefits of employing Node.js on your system. Let’s get a rapid glance at them!
- Straightforward syntax
- Effortless to learn new dexterities
- Immediate communication
- Cross-platform programming
- Easy and quick scaling capacity
- Flexibility as well as open source nature
- Full-stack single-language development
- A sizable & vibrant community support
Removing Node.js
You can make use of either apt or nvm in order to uninstall Node.js according to how it was installed initially
The apt command is employed for removing the version from the system repositories. You can execute the following commands in order to remove Node.js from your Ubuntu system:

Further, in case you also do not wish to save the configuration files for later usage, you can execute apt purge command as:

On the other side, you can uninstall Node.js with the utilization of NVM, in case you have installed Node.js using nvm initially. For this, you need to first verify if it is running as the most recent version:

Next, you can deactivate the version using the following commands after verifying:
nvm deactivate

Executing the above command will remove NVM from Ubuntu and uninstall Node.js.
In case the version you are targeting does not fall under the current active version, you can directly implement:
Also Read: How to Install Ubuntu Alongside With Windows in Dual-Boot | Hostbillo
Conclusion
By going through this guide thoroughly, you must have apprehended different ways how to install node js in Ubuntu. Also, you have learned how to uninstall Node.js with different methods. Further, your choice of picking a specific method to uninstall or install node.js on Ubuntu is determined by your situation or circumstance ultimately. Moreover, working with Node.js enables you to attain many incredible benefits for your operations. You may reach out to our experts anytime if you may encounter any query or issue during the installation of Node.js.