Overview
Node.js and NPM (Node Package Manager) are essential elements for contemporary web development. Installing them on your Mac is a simple method, and this guide will take you through all the steps. Whether you’re a seasoned developer or just getting started, having Node.js and NPM on your Mac opens up a world of possibilities for building powerful applications.
Prerequisites
Before we dive into the process where we install Node.js and NPM on Mac, make sure that you have Homebrew installed on your Mac. Homebrew streamlines the installation of numerous software packages, including Node.js and NPM.
What’s NPM?

NPM (Node Package Manager) is a powerhouse in JavaScript development, seamlessly enhancing the development experience. Let’s explore its key facets:
Package Management:
- Facilitates effortless organization and sharing of code packages.
- Simplifies package installation, updates, and removal.
Dependency Resolution:
- Efficiently resolves and installs package dependencies.
- Creates a structured dependency tree for project integrity.
Version Control:
- Enables precise version specification for consistency.
- Guards against version conflicts and unexpected issues.
Scripting Power:
- Acts as a robust scripting tool in the package.json file.
- Automates tasks like testing, building, and deployment.
Registry and Collaboration:
- Serves as a global registry for sharing packages.
- Fosters collaboration within the vast JavaScript community.
Global and Local Installation:
- Supports both global and project-specific (local) installations.
- Offers flexibility in managing package scope.
Versioning and SemVer:
- Adheres to Semantic Versioning (SemVer) for clear communication.
- Facilitates predictable package updates.
Security Features:
- Integrates security tools like npm audit.
- Proactively identifies and addresses project vulnerabilities.
What’s NodeJS?

Node.js, often referred to as Node, is a runtime environment that enables developers to implement JavaScript code server-side. This powerful technology has transformed web development, permitting the construction of scalable as well as high-functioning applications. Let’s explore the intricacies of Node.js:
Node.js Essentials:
- Node.js extends JavaScript’s capabilities to the server side.
- It facilitates the creation of fast-speed, scalable network applications.
- Recognized for its non-blocking, event-driven architecture.
Installation on Mac:
- To employ the power of Node.js on your MacBook, follow these steps:
- Open your Terminal and initiate the installation process with Homebrew.
Verifying the Installation:
- After installation, confirm Node.js is properly installed.
- Check the Node.js version.
- Verify npm (Node Package Manager) installation.
Node.js Version Control:
- Managing Node.js versions is crucial for compatibility.
Global and Local Packages:
- Node.js allows the installation of packages globally or locally.
- Global packages are available system-wide, while local installations are project-specific.
Brew Install NPM:
- Homebrew simplifies npm installation. If necessary, install npm separately.
Enhancing Macbook Development:
- Leverage npm, bundled with Node.js, to manage project dependencies effortlessly.
- Utilize npm scripts for automating tasks and enhancing development workflows.
Troubleshooting Node.js Installation on Mac:
- Ensure macOS and Xcode Command Line Tools are up-to-date.
- Refer to the Node.js GitHub repository for troubleshooting tips.
Node.js Download and Updates:
- Stay informed about the latest Node.js releases for enhanced features and security.
- Regularly update Node.js using Homebrew.
Installing Node.js and NPM on Mac

Let’s streamline the process into four straightforward steps, assuring a hassle-free setup for your development environment.
Step 1: Initiating Node.js Installation
To kickstart the installation process, utilize the power of Homebrew. This package manager simplifies the installation of Node.js on your Mac. Open your Terminal and execute the command:
brew install node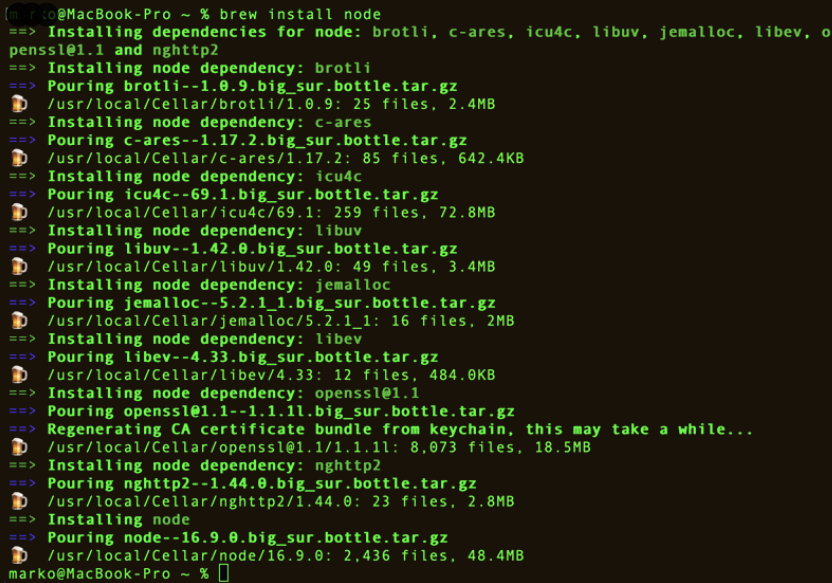
This command not only fetches the latest version of Node.js but also ensures a hassle-free installation.
Step 2: Verification of Node.js and NPM Installation
Confirming that Node.js and NPM are correctly installed is crucial. Use the following commands in your Terminal:
node -vnpm -v

These commands provide insights into the versions of Node.js and NPM on your Mac, ensuring a successful installation.
Step 3: Exploring Node.js Version Control
Managing Node.js versions becomes essential for maintaining project compatibility. Consider exploring tools like nvm (Node Version Manager) if you need to switch between different Node.js versions.
Step 4: Leveraging NPM for Enhanced Development
As NPM is bundled with Node.js, you gain immediate access to a powerful package manager. Utilize it to manage project dependencies effortlessly and enhance your development workflow. You can install packages globally or locally based on your project’s requirements.
Also Read: How to Install PIP on Mac?
Set NODE HOME in the Environment Variable
Elevate your Node.js environment on your Mac by configuring the NODE_HOME environment variable. This simple yet powerful step enhances your development setup, ensuring seamless interaction with Node.js and NPM. Let’s dive into the process of setting NODE_HOME and its significance in your development workflow.
Understanding NODE_HOME:
NODE_HOME is an environment variable that points to the installation directory of Node.js. By setting NODE_HOME, you streamline the accessibility of Node.js and associated tools, simplifying your development processes.
Step 1: Locate Node.js Installation Directory:
Before setting NODE_HOME, identify the installation directory of Node.js on your Mac. Typically, with Homebrew, Node.js is installed in the /usr/local/Cellar/node directory.
Step 2: Setting NODE_HOME:
Open your Terminal & implement the stated command to set NODE_HOME. Replace [Node.js_directory] with the actual path to your Node.js installation directory:
export NODE_HOME=[Node.js_directory]This command informs your system about the location of Node.js, streamlining future interactions.
Step 3: Updating PATH Variable:
For seamless execution of Node.js and NPM commands, update the PATH variable. Add the following line to your shell profile file (e.g., .bash_profile or .zshrc):
export PATH=$NODE_HOME/bin:$PATHThis addition ensures that your system knows where to find Node.js binaries.
Step 4: Verification:
Confirm that NODE_HOME is correctly set and PATH is updated. Employ the given commands:
echo $NODE_HOMEnode -vnpm -vThese commands verify the NODE_HOME value and display the installed Node.js and NPM versions, ensuring a successful setup.
Benefits of Setting NODE_HOME:
- Simplified Commands: NODE_HOME ensures that your system recognizes Node.js and NPM commands globally, making it easier to execute them from any directory.
- Version Control: Setting NODE_HOME aids in managing multiple versions of Node.js on your system, providing flexibility for diverse projects.
- Consistent Environment: NODE_HOME contributes to a consistent and organized development environment, reducing the likelihood of version conflicts and ensuring smooth project execution.
Also Read: How to Install Node.js on Ubuntu
Conclusion
The journey to install Node.js and NPM on your Mac has equipped you with a robust foundation for dynamic JavaScript development. Leveraging the simplicity of Homebrew, you seamlessly brought these essential tools to life, ensuring a straightforward and efficient installation process. The verification steps instilled confidence by confirming the versions of Node.js and NPM, laying the groundwork for a stable development environment. Delving further into additional configurations, such as setting NODE_HOME and exploring version control with tools like nvm, has provided you with flexibility and adaptability for diverse project needs. By optimizing your commands and fostering a consistent environment, your Macbook now stands as an empowered hub for web development.