Introduction
There can be times when you or any program modify files in the package unnecessarily. The other case is the files in a package can be accidentally removed. In both situations, there are chances that your system suffers damage. Most of the time, users install the respective package again and resolve the issues. However, while employing the apt-get install command, you will get an error stating that the package is already present.
The –reinstall flag serves as a shortcut for an apt-get command. It is utilized in order to reinstall packages while making use of the most up-to-date versions. This is highly beneficial for packages with various reverse dependencies. In this guide, you will get insights into how to utilize apt-get reinstall for reinstalling packages on Debian and Ubuntu.
Furthermore, you must make a note here that employing the –purge remove the option for eliminating packages and installing them again will render you similar outcomes. But, it will also remove configuration files.
Requirements
Before we move on to steps to reinstall packages employing apt-get reinstall, let us tell you the prerequisites you need to meet first –
- You must have an account that possesses sudo privileges.
- You need to have access to the command line/ terminal.
- You must have a Debian/Ubuntu system.
Reinstall Packages Using apt-get
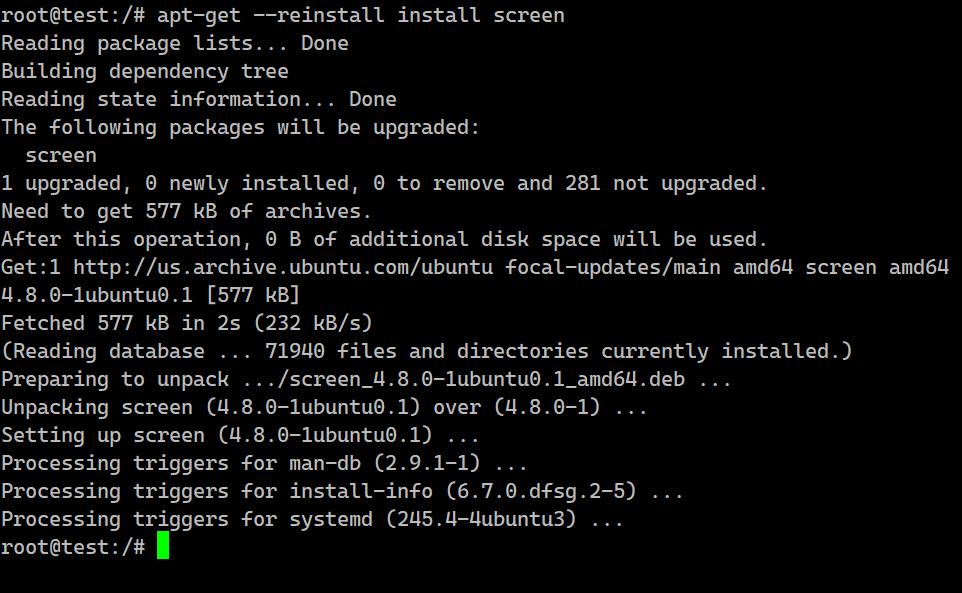
There is a simple process for utilizing the –reinstall command. Enter the following syntax –
Moreover, if you need to reinstall more than one package, you have the possibility to list them all in one line using the syntax –
Reinstall htop Using apt-get
htop is an interactive process viewer on Ubuntu. In order to reinstall htop employing the –reinstall flag, you can enter the apt-get command as –

Reinstall Packages Using aptitude Command
Aptitude serves as a graphical user interface when it comes to the apt package manager. However, you can employ it with the command line as well. If you need to reinstall a package with aptitude, enter the following syntax –
Moreover, you can make use of the command –
if you want to reinstall ALL packages.


Reinstall apt After You Accidentally Removed It
In case you remove the apt accidentally and want an apt-get reinstall package, you can perform an apt-get force reinstall. It will take you the following three steps –
- First of all, browse https://packages.debian.org/apt in order to search for the release that you prefer. Also, you must avoid testing or unstable releases.
- Next, opt for the needed and preferred version number. And then, download the package for your architecture.
- In the last step, run the following command in the terminal –

Also Read: How to Install Ubuntu Alongside With Windows in Dual-Boot | Hostbillo
Conclusion
Going through this tutorial thoroughly, one can become capable of reinstalling packages employing both apt-get and aptitude commands. Also, one will also be able to restore apt or perform apt-get reinstall itself if it has got eliminated accidentally. Furthermore, you can always connect with the Hostbillo experts while finding any difficulty when you reinstall the Ubuntu server from the terminal or packages using apt-get reinstall. We, along with our experts are available via multiple communication modes to help you get solutions in the least possible time.