


Introduction
You will discover how to set up and install Docker on Ubuntu 22.04 in this article.
Users can package & run apps in containers using the technology known as Docker. Unlike virtual computers, which are immobile and resource-intensive, containers stay isolated. On a particular host, several containers could run together due to the isolation.
To maintain the containers, Docker utilizes a client-server framework including the Docker daemon. So let us begin.
Definition of Docker
Your application(s) can all get packaged up and delivered to the cloud using the Docker (formerly known as “dot-docker”) infrastructure with no dependency. You need to get a full grasp of Docker’s advantages if you’ve started developing cloud-based services. This technology makes it easy to build isolated situations and seamlessly adjust them either upwards or downwards.
System Requirements
Your system requires the following to achieve this goal:
- installation of Ubuntu 22.04.
- an individual user account having admin rights.
- (Ctrl + Alt + T) Connection to the terminal.
Install Docker on Ubuntu 22.04

For administering Docker and Kubernetes containers, Ubuntu is the best medium. This is partly because Ubuntu powers millions of machines internationally, and also seems to be quick, safe, and open-source, allowing it to run containers at volume.
This guide will go through two methods for installing Docker on Ubuntu:
- to ensure the most recent Docker version, from the authorized Docker source.
- as per the built-in Ubuntu repository, making installation quicker.
Install Docker on Ubuntu 22.04 by following the instructions listed below and selecting your preferred installation method.
It is critical to remember When setting up a fresh installation of Docker, stay careful to uninstall any previous ones. Your produced images, containers, volumes, and networks are not erased when you uninstall earlier versions of Docker. To get rid of earlier versions, execute the next command:
- sudo apt-get remove docker docker-engine docker.io contained runc
Install Docker on Ubuntu using the Official Docker Repository

(Solution 1)
Get the most recent steady program version by installing Docker Ubuntu from the authorized Docker repository. You should first add the new package source to Ubuntu before installing Docker to gain entry to the approved Docker repository. Do the following actions:
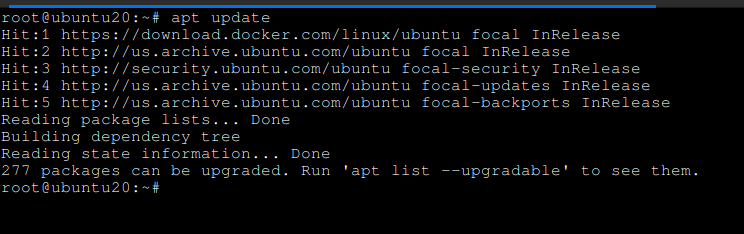
Step 1: Upgrade the Package Repository
Use the command below to upgrade the platform’s package repository and guarantee that the most recent required packages get downloaded.
- sudo apt update
To start the upgrade, simply provide your root password when asked and hit Enter.
Step 2: Install the Required Packages
For the system to utilize packages over HTTPS, the suitable package manager needs a few necessary packages. For Ubuntu to be able to access the Docker repositories over HTTPS, use the command prompt:
- sudo apt install apt-transport-https ca-certificates curl software-properties-common -y
The aforementioned command:
- makes it possible for apt to send data as well as files over https.
- examines security certificates for the system.
- the data-transfer tool curl gets installed.
- includes scripts for managing software.
Step 3: Insert a GPG key
A GPG key confirms the legitimacy of a software program. Run the following command on your PC to add the Docker source GPG key.
- curl -fsSL https://download.docker.com/linux/ubuntu/gpg | sudo apt-key add –


As a means of authenticating the result, it should say OK.
Step 4: Provide a Docker repository
To include the Docker repository in the appropriate sources list, execute the following command:
- sudo add-apt-repository “deb [arch=amd64]
- Ubuntu Linux download at https://download.docker.com/focal-stable”
Adding the authorized Docker repository and updating the package directory with the most recent Docker packages are both done by the command.
Step 5: Determine the Installation Source
Use the apt-cache function to confirm that the Docker setup source is the Docker repository instead of the Ubuntu repository. The apt-cache tool looks up the Docker packages we initially put in the apt package manager’s cache of packages.
Initiate the command below:
- apt-cache policy docker-ce
In the newly inserted source repository, the output indicates which edition is the most recent.
Step 6: Set up Docker
Run the following command to install Docker:
- sudo apt install docker-ce -y

Keep your patience while the installation is being completed.
Step 7: Verify Docker Status
Examine to see if Docker gets installed, the daemon is running, and also the process is set to launch at boot. Execute the command line:
- sudo systemctl status docker

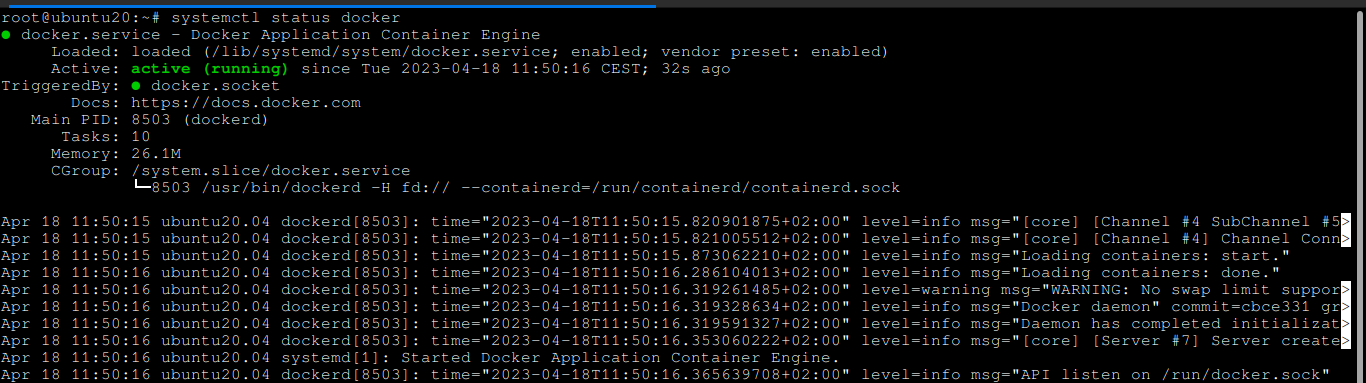
Its output indicates that now the Docker daemon has become operational.
Also Read: How to Install Node.js on Ubuntu: A Step-by-Step Tutorial
Install Docker on Ubuntu from the default Ubuntu Repositories
(Solution 2)
Using the Ubuntu default repository is another option for installing Docker on Ubuntu. The Docker package might not be the most recent version, but the implementation is simpler. Use the instructions below to run Docker using the default repository when you don’t want to utilize the most recent version of the software.
Step 1: Upgrade the Repository
Run the following command to make sure the local system package source gets upgraded:
- sudo apt update

When requested, type the root password and sit tight for the operation to get completed.
Step 2: Download and Install Docker
Configure Docker by running the following command:
- sudo apt install docker.io -y
When the -y flag gets used, any prompt throughout the configuration is automatically answered with the word “yes.”
Step 3: Add Dependencies
The following command should be used to download all Docker-required packages:
- sudo snap install docker


This command uses the Snap package manager to extract every dependency.
Step 4: Verify Setup
Using the status command and maybe even looking at the software version will reveal if Docker got installed correctly. Run the following command to view the Docker daemon position:
- sudo systemctl status docker

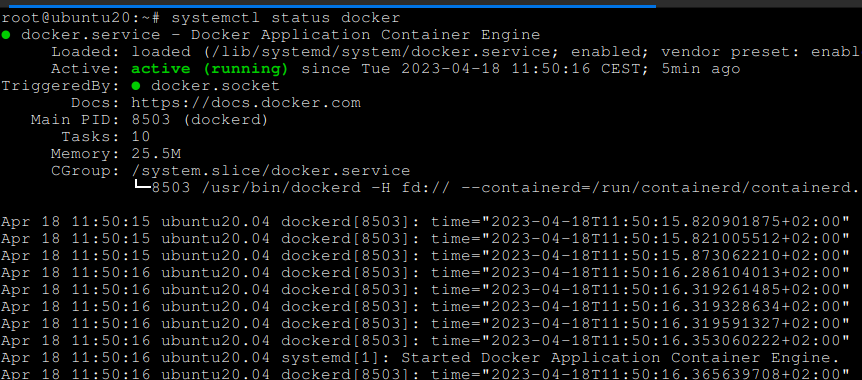
You can also do the following to determine the software version:
- docker –version


Using Docker in Ubuntu
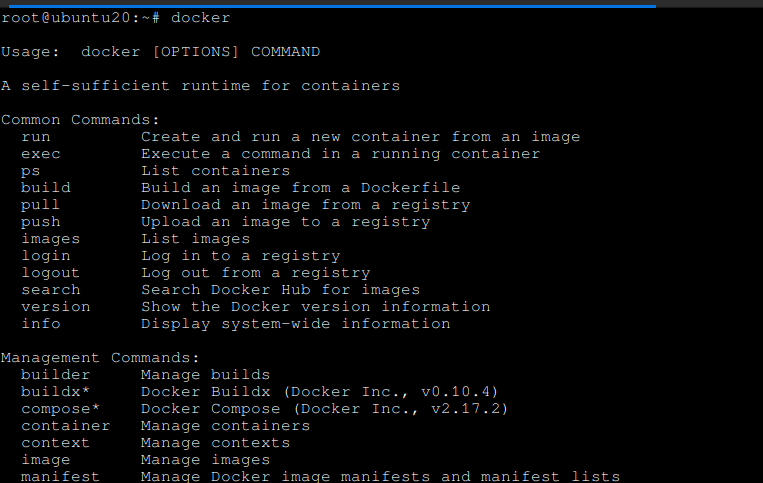
Trying to run the docker command inside the terminal will display all accessible Docker-relevant data, containing syntax, parameters, and commands:
- Docker

Installing Docker, setting up containers, and controlling Docker volumes are the first steps in using it.
Docker Post-Installation Steps (USE THIS HEADING FROM REFERENCE – Working With Docker Containers)
An isolated virtual setting made from a Docker image is known as a Docker container. To automatically download an image and construct a container, choose an image you’ve already downloaded and mention its name in the docker command line.
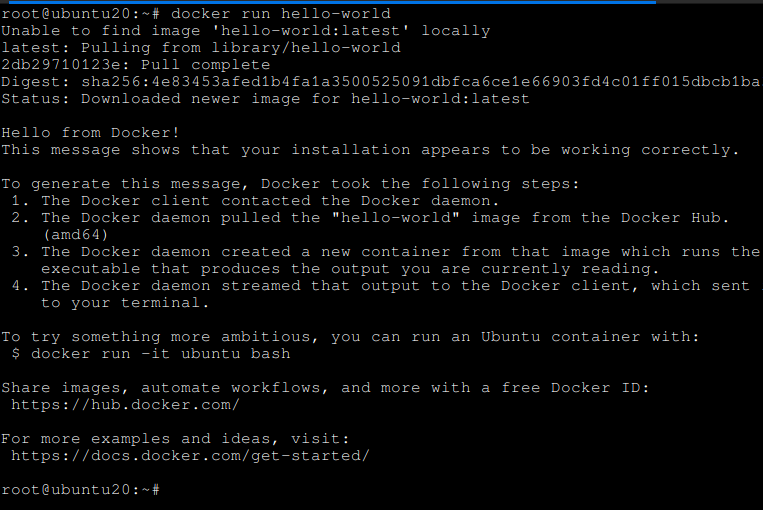
For instance, spin up a container using the oh hi image and install a test image. Execute the following command:
- sudo docker run hello-world


In response to the command, Docker will acquire the image from Docker Hub and launch a container. The “Hello from Docker” greeting and a description of the way the container functions are displayed after it gets created, and Docker subsequently shuts it down.
Launch a Docker container
A Docker container gets launched using the run subcommand, just like the test container generated in the previous part. To create a new Docker container, use the following syntax:
- sudo docker run [image-name]
Provide the name of the picture that will serve as the container’s foundation in the [image-name] field. The name that Docker gives each new container is particularly special. Instead, launch a fresh container as well as assign it a title of your choosing by using the —name switch:
- sudo docker run –name [container-name] [image-name]


To construct a container utilizing the Ubuntu Docker image we previously got, for instance, use the command below:
- sudo docker run ubuntu


The command builds a container from the given image, though it does so in non-interactive mode. Use the -i as well as -t switches to get interactive shell access to the container. Consider this:
- sudo docker run -it ubuntu


As soon as the container ID gets used to locate it, the terminal modifies its message to indicate that it is working inside of a container. When starting, stopping, or removing a container, use its ID.
Use any command as appropriate to communicate with the system after executing the container in interactive mode. Additionally, since root has access, sudo is not required. All adjustments performed inside the container only affect that particular container.
By using the exit command inside the prompt, leave the container.
Observe Docker Containers
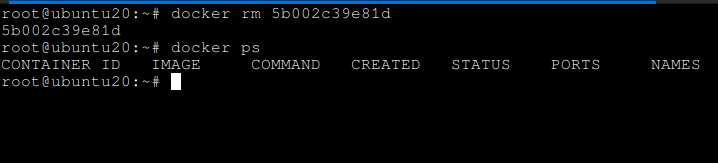
Any Docker container that is still running is considered to be operational. Listing containers is helpful since it provides the specific ID and description needed when initiating, pausing, or deleting a container.
Run the following command to only see running Docker containers.
- sudo docker ps

Activated containers are listed in the response of the command. There are a few containers in the system despite the absence of containers in the list since they are all currently shut down.
Add the -a flag to list every container, even those that are not active:
- sudo docker ps -a


The command produces a list of every container that is currently running, together with information about each one, such as its ID, picture, command, formation time, progress, ports, and distinctive name.
Another option is to only display the most recent container by giving the -l flag:
- sudo docker ps -l

Open a new Docker container
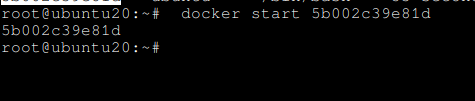
Docker start can be used to restart a stopped container. The syntax is as follows:
- sudo docker start [container-ID | container-name]


Therefore provide the container title or perhaps the container ID.
Upon creation, Docker gives each container a special name, which gets known as the container name.
By listing every container, you may get the ID and description.
The Ubuntu Docker container you established earlier, for instance, gets started by the command line:
- sudo docker start 5b002c39e81d
Terminate a Docker container
The docker stop function can get used to terminate an active Docker container. The syntax is as follows:
- sudo docker stop [container-ID | container-name]

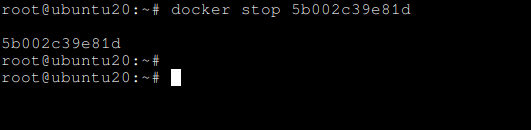
Use these commands, for instance, to terminate the active Ubuntu container:
- sudo docker stop 5b002c39e81d
Uninstall a Docker container
Docker’s rm command can get used to deleting a pointless container. In terms of syntax:
- sudo docker rm [container-ID | container-name]

The oh hi test container we successfully created, for instance, gets deleted with the following command:
- sudo docker rm silly_hamilton
Advantages of Using Docker

There are numerous advantages to using Docker for developing and distributing applications:
- caching a group of containers
- optimized resource allocation
- Scalability, which allows several containers to get housed on a particular host
- utilizing equipment that is far less expensive than normal servers to run your business
- Easy instance creation, quick deployment, as well as quick migrations.
- Your apps’ ease of maintenance and transfer
- Improved security, reduced access to the program code within containers, but also minimal software dependencies
Also Read: How to Update Node js Version on Windows, Ubuntu, and Mac?
Summing Up
As you construct the container architecture required for developing cloud apps, bear in mind these advantages of Docker. So rather than merely constructing each application and delivering it separately, your strategy needs to entail employing Docker containers for a number of your apps.
Docker can now get used to obtaining images and launching containers on Ubuntu 22.04 according to the instructions in this article on how to install it.