


Introduction
Multiple users can interact with Linux at once because it is a multi-user system. You are accountable for overseeing the system’s users and groups by allowing and denying users and adding and removing them from different groups.
This article will cover how to use the useradd command in Linux to set up new user accounts.
Useadd Command
For the useradd command in Linux, the following general syntax applies:
useradd [OPTIONS] USERNAME


Users with sudo benefits or root are the only ones who can create new user accounts in Linux using the useradd command.
According to the choices you type at the command prompt, the useradd command creates a new user account once you run it.
Since the variables in this file are different between distributions, the Linux add user command behaves differently on various systems.
Additionally, useradd reads the data in the /etc/login.defs file. This file includes configuration information for the shadow password suite, including password expiration policy, user ID ranges used when creating the system and regular users, and more.
How to add User in Linux?

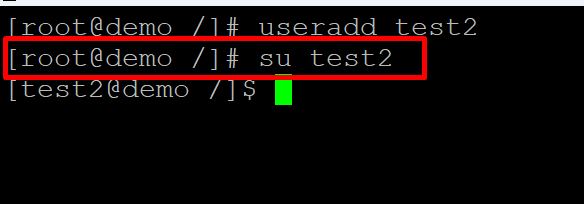
Use the useradd command after entering the user’s name to create a new user account in Linux.
If you wanted to make a new user with the name username, you might run:
sudo username

Useradd uses the default settings listed in the /etc/default/useradd file when it is run without any options, creating a new user account.
You need to mark the account password prior to logging into the recently created user in Linux. Perform the passwd command, then enter the username:
sudo passwd username.

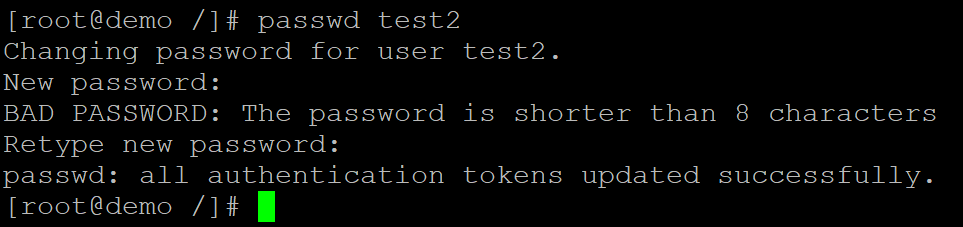
Keep in mind to choose a unique password.
Add a New User and Create a Home Directory
Most Linux distributions do not build the user’s home directory whenever a newly added account is set up with the useradd command.
The home directory would be created by implementing the -m (—create-home) element.
sudo useradd -m username

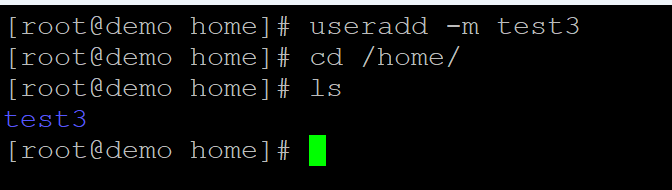
With the aforementioned command, the user’s home directory is created and files from the /etc/skel directory are copied over. You can find the initialization files by listing the files in the /home/username directory:
ls -la /home/username/

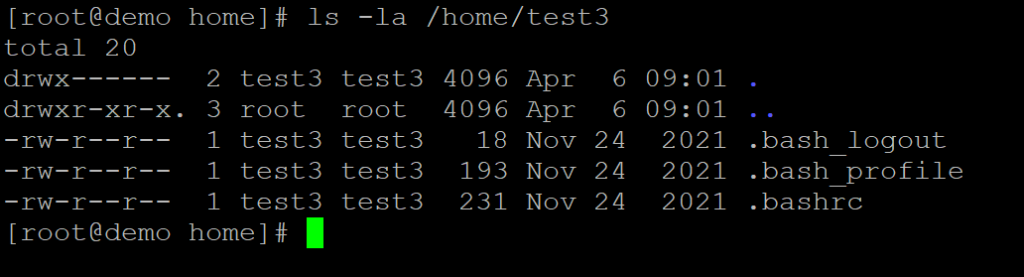
A user’s home directory can contain folders and files that they can add, change, and delete.
Create a User with a Specific Home Directory
Useradd Command in Linux instantly creates the home directory. If you want to place the user’s home directory somewhere else, then use d (—home) feature.
Using the example below, you can make a new user with the name username and a home directory of /opt/username:
sudo useradd -m -d /opt/username username

Create New User in Linux with Specific User Id
Usernames and unique UIDs are used in Linux and other Unix-like operating systems to identify users.
The Linux program gives each user a special positive integer that they can refer to as their “user identifier” (UID). The UID as well as other access control policies define the types of activities a user is allowed to perform on system resources.
The system will automatically designate the following UID from the catalog of user IDs mentioned in the login.defs file to a newly created user Linux.
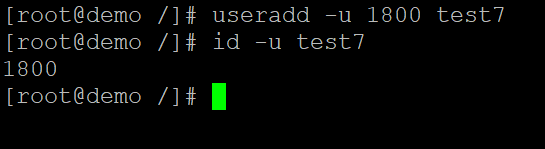
When operating useradd, utilise -u (—uid) option to set up a user with an unique UID. For instance, to create a new user with the UID of 1700 and the name username, you would type:
sudo useradd -u 1700 username
With the id command, you can confirm the user’s UID:
id -u username

Create a User with a Specific Group Id
User accounts in Linux are organized and managed by groups, which are organizational units. The main function of groups is to specify a set of privileges that can be shared by all members of the group, such as permissions for reading, writing, or implementing a specific resource.
When adding a new user, the useradd prompt automatically creates a group that has the exact name as the username and the identical GID as the UID.
By using -g (—gid) feature, you can allocate a user to a specific initial login group. You can choose between stating the group name and the GID number. The group ID or name must already be in use.
In this example, we’ll create a brand-new user with the name username, and we’ll set the login group to user type.
sudo useradd -g users username


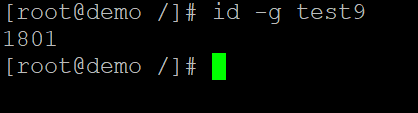
You could perhaps validate the user’s GID by using id prompt:
id -gn username
Add a User and allot Multiple Groups
The terms “primary group” as well as “secondary group” refer to two distinct categories in Linux operating systems. Each user has a maximum of one primary group and zero to more secondary groups to which they can belong.
With the -G (—groups) option, you can specify a list of extra groups that the user will belong to.
With the primary group users, secondary groups wheel, and docker, the following command creates a new user with the name username.
sudo useradd -g users -G wheel
Additionally, you could incorporate searching
id username
Add User in Linux without any Home Directory
Some situations call for us to step away from giving users home directories for safety purposes. In this case, the user’s home directory will be root when they log into a system that has just restarted. When such a user executes the su command, the previous user’s home directory will be used as the login directory.
Using the option “-M,” users can be created without having home directories. You can make a user without the need for a home directory by using the command prompt, for example.
sudo useradd -M username


The ls command will now be used to confirm that the user was established with no need for a home directory.
sudo ls -l /home/username
ls: cannot access /home/username: No such file or directory
Add New User with Expiry Date
You can designate a day and time for the newly added accounts’ expiration by using the -e (—expiredate) feature. This can be used to create temporary accounts.
In order to specify a date, use the format YYYY-MM-DD.
For instance, to make a new user account with the name username (ABC) and an expiration date of April 07th, 2023, you would execute the following command:
sudo useradd -e 2023-04-07 username (ABC)


To find out when an account will expire, choose the change prompt:
sudo chage -l username(ABC)


Create New User with Custom Comments
You can provide a precise description for the new user by using the -c (—comment) option. Usually, a comment will include the user’s full name or contact information.
In the example below, we are adding a new user with the name username and the comment text string Test User Account:
sudo useradd -c “Test User Account” username
grep username /etc/passwd

Another name for the comment section is GECOS.
Add User with a changed login shell
The login shell for a new user is automatically set to the one listed in the /etc/default/useradd file. The default shell setting varies between distributions; in some, it is /bin/sh, and in others, /bin/bash.
With the -s (—shell) feature, you can identify the newly added user’s login shell.
For example,
sudo useradd -s /usr/bin/zsh username
Determine the user’s login shell by examining the entry in the file:
grep username /etc/passwd

Do you know what is Linux xargs Command and how you can use it? Read this article on – How to Use the xargs Command in Linux?
The command for Changing the Default useradd Values
The -D, —defaults function, allows you to see and modify the standard useradd configurations.
To see the current default options, use the following syntax:
useradd -D
Consider the scenario where you want to switch from /bin/sh to /bin/bash as the default login shell. Enter the new shell in the following format to achieve that:
sudo useradd -D -s /bin/bash
Users can actually confirm that the standard shell component has been altered by running the command shown below:
sudo useradd -D | grep -i shell
Command to set a Password for New User
The following command can be used to set an unencrypted password for the user.
sudo useradd -p test_password username
This will set up a new user with the name “username” and the unencrypted password “test password”.
Command to Display Help
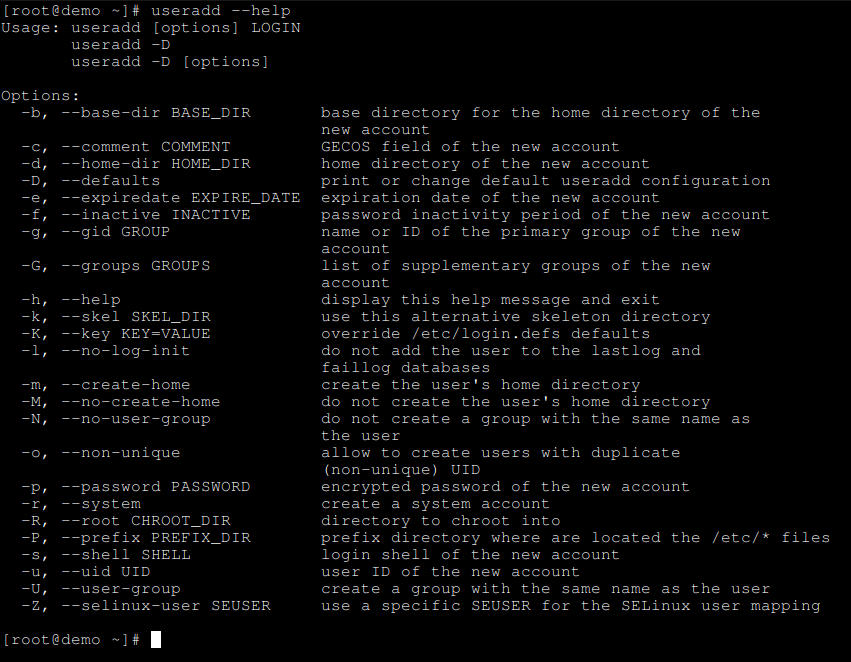
You can demonstrate help by entering the following syntax.
sudo useradd –help
The useradd command’s help section will be displayed when this command is used.

Also Read: Clear RAM Memory Cache, Buffer, and Swap Space on Linux
Conclusion
We’ve demonstrated in this article how to use the useradd command in Linux to add new user accounts. All Linux distributions, such as CentOS, RHEL, Debian, Ubuntu, and others, also should follow the same instructions. As of right now, you can test these features and attempt to give Lunix more functionality.